


/cloudfront-us-east-1.images.arcpublishing.com/octane/N6BPCJ3YPH7H3OHXKC52LHIWB4.gif)
Wrist: Zack Courts
MSRP (2015): $16,490
Miles: 2841
MPG: 33
Mods: R&G Racing crash equipment
As I set off on this journey to prepare this long-term Yamaha YZF-R1 for racing, my colleague and officemate Ari Henning warned me that it would be more time consuming than I thought. He was right. I eventually succeeded, and pitted my skills and the R1’s base-level KYB suspension against a fleet of Southern California club racers, but before I did that I had to do this...
If you're an experienced and confident mechanic taking apart a motorcycle is no big deal, especially if that motorcycle is simplistic in design. I am not an experienced or confident mechanic, and the Yamaha R1 is not a simple machine. But in order to mount up race bodywork (read that story HERE) I had to strip this motorcycle naked, so I started unscrewing nuts 'n bolts and undressing the R1.
The first few body panels come off with dzus fasteners, which are pure brilliance and reminded me of my RS125 grand prix bike. Soon, though, the screws get harder to find and the path toward removing all of the bodywork cleanly is more and more obscure. It is at this point I would recommend getting your hands on a service manual. This 2015 R1's manual is available at yamahapubs.com for $89, and if you plan to take more than one layer off your bike it'll put your mind at ease and teach you plenty along the way.
This is also a good time to mention that I employed the Ziploc-and-Sharpie technique for organizing parts. I took a LOT of stuff off this R1 in stripping it, from the rear blinkers, to the mirrors, to heat shields around the exhaust, and fasteners for everything in between. Organizing batches of hardware in bags, then labeling it and taping it to the associated accessory or piece of bodywork will go a long way when it comes time to put it all back together. (For more tips on how to be a better mechanic, watch Ari Henning's MC Garage video HERE.)
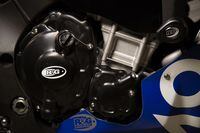
Once naked, bolting on the trio of R&G Racing case covers (twistedthrottle.com; $285/set) was a cinch. A few of the case bolts are replaced with slightly longer ones to accommodate the 4mm-thick polypropylene covers (again, tag and bag these parts), and you're good to go. I think they look pretty slick, too. Hopefully I won't test them! (A quick note for when you remove the kickstand: trace the switch up to a plug near the shift pushrod, then create a little horseshoe of safety wire and jump the circuit so that the bike thinks the kickstand is up. Voila! No kickstand and the bike still starts).
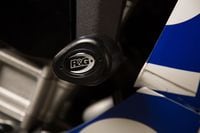
The next bit was trickier, as I installed basic frame sliders for the R1 (twistedthrottle.com; $120/set). These pieces don't affect the bodywork, which is great, but they do require removing engine mounts. I did not think this through. It worked out fine, but what I have done, obviously, is put a scissor jack under the engine to take the weight off the motor mounts, then remove and reinstall the bolts holding the frame sliders. Lesson learned! (I'm a better mechanic than I was when I started.)
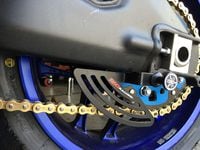
Then, I bolted up one last little item from R&G, and one that I would definitely recommend; a chain guard. If you’ve hung around racers you’ve probably seen a stump of a finger or toe that was sheared off when it got sucked into the sprocket/chain assembly in a crash. I know a few guys who have had this happen, and I think it’s definitely worth the $52 asking price from Twisted Throttle. It holds on via the rear-stand-spool bolt, takes 30 seconds to install, and could save you a digit or two.
Some people say crash equipment puts you in the wrong state of mind, but I’m definitely of the belief that you should dress for the crash rather than the ride. The same goes for the bike, especially taking it to the track like I am doing. And heck, around $450 for a good suite of crash protection on a 2015 R1 seems pretty reasonable considering it could save countless electronic pieces, magnesium and aluminum parts, and a big headache in the shop.
/cloudfront-us-east-1.images.arcpublishing.com/octane/G4MG6OUCJNBSHIS2MVVOTPX65E.jpg)
/cloudfront-us-east-1.images.arcpublishing.com/octane/IIGGWFOTOJGB7DB6DGBXCCMTDY.jpg)
/cloudfront-us-east-1.images.arcpublishing.com/octane/QSTCM6AVEZA5JJBUXNIQ3DSOF4.jpg)
/cloudfront-us-east-1.images.arcpublishing.com/octane/U4I7G625B5DMLF2DVIJDFZVV6M.jpg)
/cloudfront-us-east-1.images.arcpublishing.com/octane/B6XD6LS6IVCQPIU6HXDJSM3FHY.jpg)
/cloudfront-us-east-1.images.arcpublishing.com/octane/ICL63FEDDRDTTMINYICCEYGMDA.jpg)
/cloudfront-us-east-1.images.arcpublishing.com/octane/FCGZHQXRBZFLBAPC5SDIQLVF4I.jpg)
/cloudfront-us-east-1.images.arcpublishing.com/octane/WNOB6LDOIFFHJKPSVIWDYUGOPM.jpg)
/cloudfront-us-east-1.images.arcpublishing.com/octane/X33NU3E525ECRHXLNUJN2FTRKI.jpg)
/cloudfront-us-east-1.images.arcpublishing.com/octane/6KKT5NNL2JAVBOXMZYS5ZO76YA.jpg)
/cloudfront-us-east-1.images.arcpublishing.com/octane/J5RKG5O455GMPGQRF2OG6LRT7A.jpg)
/cloudfront-us-east-1.images.arcpublishing.com/octane/GX2CIZKQVRH2TATDM26KFG2DAE.jpg)
/cloudfront-us-east-1.images.arcpublishing.com/octane/ZWIDYSAKQZHD5BHREMQILXJCGM.jpg)
/cloudfront-us-east-1.images.arcpublishing.com/octane/CYUHJZCTSJCH3MRAQEIKXK7SCQ.jpg)
/cloudfront-us-east-1.images.arcpublishing.com/octane/LKOFINY56FCXJCANJ5M7ZDQUBY.jpg)
/cloudfront-us-east-1.images.arcpublishing.com/octane/4NBPDACMWJH63JQYJVK3QRBDZI.jpg)
/cloudfront-us-east-1.images.arcpublishing.com/octane/KKHQHRR3FJGX7H2IPU6RALMWG4.jpg)

/cloudfront-us-east-1.images.arcpublishing.com/octane/5IOFS5JAE5FOXMNA23ZRAVVYUU.jpg)
/cloudfront-us-east-1.images.arcpublishing.com/octane/CGXQ3O2VVJF7PGTYR3QICTLDLM.jpg)
/cloudfront-us-east-1.images.arcpublishing.com/octane/OQVCJOABCFC5NBEF2KIGRCV3XA.jpg)
/cloudfront-us-east-1.images.arcpublishing.com/octane/OPVQ7R4EFNCLRDPSQT4FBZCS2A.jpg)