


There's a delicious irony in all this. Motorcycle buyers demand all the bells and whistles, particularly on sportbikes. And they complain bitterly if their new mount lacks anything that might be on Nicky's or Troy's factory-backed racer--especially in terms of chassis and suspension adjustability. And yet we get letters all the time suggesting that the myriad suspension adjustments are unclear at best and purely baffling at worst.As we continue our "How It Works" journey through a bike's suspension, let's step aside for a moment and talk about the adjusters--what they do (and don't do), how to set them and how to go about making changes intelligently.
Most sportbike makers understand that many riders find adjusting the suspension daunting and have taken two big steps to help out. One, the baseline settings outlined in the owners' manual are truly a good place to start. If you've just bought your bike or have lent it to a tinkering-minded friend, take a moment to reset all the adjusters to the factory "zero" settings before you do anything else.
Two, there's seldom enough range of adjustment to wholly screw up the motorcycle. Yes, it'll feel weird with the adjusters set wrong, but the bike won't be dangerous.
Some terminology, then. First of all, it's damping, not dampening; if you hear a suspension modifier say dampening, you should politely excuse yourself and make haste in the opposite direction. There are two main terms used to describe damping: compression and rebound. Compression damping assists the spring in resisting bumps and loads placed on the motorcycle, which is manifested in upward wheel motion. This kind of damping does not add spring rate or make the bike carry a bigger load; it merely changes the rate at which the wheel is allowed to travel upward relative to the chassis. Rebound is the opposite. After the wheel has hit a bump, the spring tries to force the suspension and wheel back toward the ground. As you might guess, rebound damping controls the rate at which the wheel is allowed to extend.
Bumps come in all shapes and sizes, so the suspension needs different damping rates at different times. When you twiddle an adjuster, you are controlling only the low-speed damping--that is, the control exerted inside the shock or fork over large, rolling kinds of bumps, or during braking and acceleration. Except for a few high-end shocks, you do not have any control over high-speed damping, which comes into play when the tires ride over closely spaced, rippled bumps. Remember, it's the speed of the suspension component we're talking about here, not the velocity the bike is traveling over the ground.
You've heard of the scientific method, right? It merely says that accurate testing requires minimizing the variables and keeping track of what you've done. This is why you should make one change at a time, to one end of the bike at a time. It's fairly common for a shock problem to make the fork seem to act oddly, and you don't want to be fooling yourself by changing both the shock and fork settings at the same time. Make one change, ride, take notes, make another change, ride, and so on...until the bike begins to feel odd or the ride deteriorates sufficiently to affect traction.
Please take notes. Few adjusters give you an obvious indication of the settings, and if you get lost--was that two turns in or two clicks?--you'll have a harder time zeroing in on the right settings. Finally, take a few moments with your bike's manual and get to know the suspension-adjuster locations and quirks. You need to understand that Showa components--found mostly on Hondas but occasionally on Kawasakis and Suzukis--feature "clickless" adjusters and must be treated differently (see captions).
Shock Rebound
On shocks, the typical location for the rebound adjuster is on the shaft at the bottom of the shock. Increase the rebound damping by turning the adjuster clockwise looking at the bottom of the shock. Normally, the set point is fully in. Gently wind the adjuster all the way up until it just stops; do not force it. Begin turning it back counterclockwise and count the clicks; the first position (all the way in) does not count as a click. Some shocks have screw-type adjusters that are similar to the common compression adjusters. (See the section on compression-damping adjustment for the details.) On the fork, the rebound adjuster is found on the fork caps.
Shock Compression
This is a Soqi shock, with a click-type compression adjuster adjacent to the integral reservoir. It controls low-speed compression damping only. To find the baseline, use a good flat-head screwdriver and run the adjuster all the way in clockwise. Gently, please. When it stops, turn the adjuster back (counterclockwise) the specified number of clicks. As with rebound adjusters, the compression side is often not linear. That is, you may be changing damping force by, say, half a percent per click near the maximum, or fully in settings, but probably aren't making a quarter or even an eighth of that difference as the adjuster moves farther out.
Fork Rebound
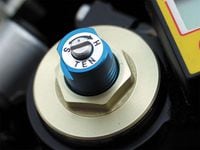
Most rebound adjusters for the fork are located on the fork cap. Note that Showa components often use stepless adjusters, indicated by the punch marks, one on the adjuster and another adjacent. To find the baseline settings, run the adjuster all the way clockwise and then turn outthe specified amount. On most new Hondas, the baseline setting is found by turning the adjuster all the way in and then back out until the punch marks align, and then out a farther full turn. Useful increments for this type of fork are often a quarter or an eighth turn. Incidentally, the word "ten" on the label has nothing to do with the number of adjustments; it signifies "tension," which is just another way of describing rebound damping.
Fork Compression
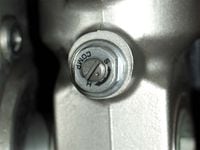
Front-end compression clickers are almost always found on the bottom of the fork leg. Showa 's compression setup is stepless (as with rebound), and the baseline setting is often all the way in plus one turn beyond the first alignment of the punch marks.


/cloudfront-us-east-1.images.arcpublishing.com/octane/G4MG6OUCJNBSHIS2MVVOTPX65E.jpg)
/cloudfront-us-east-1.images.arcpublishing.com/octane/IIGGWFOTOJGB7DB6DGBXCCMTDY.jpg)
/cloudfront-us-east-1.images.arcpublishing.com/octane/QSTCM6AVEZA5JJBUXNIQ3DSOF4.jpg)
/cloudfront-us-east-1.images.arcpublishing.com/octane/U4I7G625B5DMLF2DVIJDFZVV6M.jpg)
/cloudfront-us-east-1.images.arcpublishing.com/octane/B6XD6LS6IVCQPIU6HXDJSM3FHY.jpg)
/cloudfront-us-east-1.images.arcpublishing.com/octane/ICL63FEDDRDTTMINYICCEYGMDA.jpg)
/cloudfront-us-east-1.images.arcpublishing.com/octane/FCGZHQXRBZFLBAPC5SDIQLVF4I.jpg)
/cloudfront-us-east-1.images.arcpublishing.com/octane/WNOB6LDOIFFHJKPSVIWDYUGOPM.jpg)

/cloudfront-us-east-1.images.arcpublishing.com/octane/X33NU3E525ECRHXLNUJN2FTRKI.jpg)
/cloudfront-us-east-1.images.arcpublishing.com/octane/6KKT5NNL2JAVBOXMZYS5ZO76YA.jpg)
/cloudfront-us-east-1.images.arcpublishing.com/octane/J5RKG5O455GMPGQRF2OG6LRT7A.jpg)
/cloudfront-us-east-1.images.arcpublishing.com/octane/GX2CIZKQVRH2TATDM26KFG2DAE.jpg)
/cloudfront-us-east-1.images.arcpublishing.com/octane/ZWIDYSAKQZHD5BHREMQILXJCGM.jpg)
/cloudfront-us-east-1.images.arcpublishing.com/octane/CYUHJZCTSJCH3MRAQEIKXK7SCQ.jpg)
/cloudfront-us-east-1.images.arcpublishing.com/octane/LKOFINY56FCXJCANJ5M7ZDQUBY.jpg)
/cloudfront-us-east-1.images.arcpublishing.com/octane/4NBPDACMWJH63JQYJVK3QRBDZI.jpg)
/cloudfront-us-east-1.images.arcpublishing.com/octane/KKHQHRR3FJGX7H2IPU6RALMWG4.jpg)

/cloudfront-us-east-1.images.arcpublishing.com/octane/5IOFS5JAE5FOXMNA23ZRAVVYUU.jpg)
/cloudfront-us-east-1.images.arcpublishing.com/octane/CGXQ3O2VVJF7PGTYR3QICTLDLM.jpg)

/cloudfront-us-east-1.images.arcpublishing.com/octane/OQVCJOABCFC5NBEF2KIGRCV3XA.jpg)
/cloudfront-us-east-1.images.arcpublishing.com/octane/OPVQ7R4EFNCLRDPSQT4FBZCS2A.jpg)