


T
his article was originally published in the June-July 1997 issue of Cycle World's Big Twin magazine. Few riders are willing to delve into the deep, dark innards of their Harley’s front fork. It’s as though whatever goes on in there is some mysterious combination of rocket science and black magic. Which explains why, aside from maybe changing oil or slipping in new springs, most people leave fork repair, maintenance and modification to the guys down at the local shop. It’s easy to see why. In the rear suspension, things are pretty uncomplicated, because most shocks, including the stockers, have—as your VCR might say on the back—no user-serviceable parts inside; so, the most common way of refurbishing/modifying/upgrading the rear suspension is simply to bolt on a new/ different/better set of shocks that are configured for your bike. Zip, zap, four bolts and you’re done. A front fork presents an entirely different challenge. Sure, complete fork assemblies are available in the aftermarket, but they’re generally not a cut-and-dried, bolt-on proposition; you have to figure out what you’re trying to accomplish (lowering the bike, raising the bike, improving the ride, improving the handling, changing the look), then determine which of the available forks will get the job done. You also have to assess the new fork’s impact on steering (small changes in fork dimensions can have large effects on steering behavior); and if the swap also involves triple-trees, you’ve got to deal with more possible steering-geometry changes, along with getting the right steering-head bearings and figuring out how to mount all the stuff that attaches to the front end—brakes, fender, headlight and so on. So, while a fork swap can work wonders, it’s not a job that most backyard mechanics feel comfortable taking on. Besides, swapping forks isn’t always the answer. Unlike the shocks, Harley forks are user-serviceable; they’re pretty straightforward assemblies that most riders with any kind of mechanical experience can easily cope with. And if you can get them apart and back together for routine maintenance and repair, you also can do so for modification, whether installing longer or shorter tubes, different damper rods or a lowering kit.
There really are only two types of forks fitted to recent Harleys. Both made by Showa, they are best differentiated by their stanchion-tube diameters: There's the 39mm unit used on Sportsters, FXRs and Dyna Glides (except for the Wide Glide) made since 1987; and there's the 41mm model, used on Softails (except for the Springers, obviously), the FL series and the FXDWG.
Follow us as we walk through a fork overhaul on a 1994 Dyna Wide Glide. There are some differences in the way the FXDWG’s 41mm fork mounts to the triple-trees, but internally, it is essentially identical to the more-common 39mm model.
Before you launch into the insides of your fork, be sure you have the proper tools. Most important, you’ll need a service manual. Our resident maintenance guru, Bruce Fischer of Accu-True in neighboring Costa Mesa, says, “The factory service manual is one of the best tools you can possibly own.” You’ll also need the usual assortment of American wrenches and sockets, and a few special tools—in particular, a 3/8-inch-drive 6mm Allen wrench with a long hex shaft.

You’ll also need to jack up the bike. Professionals have dedicated lifts (Image 1), but you can use a floor jack under the right-front frame rail. Use the jack to lift the front wheel off the ground by tilting the bike over onto the kickstand. (Be very careful with this approach. Keep your tender pink parts from under the bike in case something slips.) Also have some new fork seals handy; you may not intend to replace them, but it’s a good bet that if you don’t have them, you will need them. Have some fork oil, spray silicone lube, axle grease and cleaning solvent on hand, too.

Lift the front end and begin by removing the fender. (Hint: Find an old muffin tin or a small box to hold the hardware; it’s amazing how quickly nuts and bolts will scurry the nearest workbench.) Remove the two Allen bolts (Image 2) holding the brake caliper, and slide the caliper straight off the disc so you don’t disturb the pads and the retaining clip. Remove the axle nut (Image 3); if it’s really tight, you might need a long wrench or a breaker bar. Depending upon your bike, at the other end of the axle you’ll find either a cast axle-clamp secured by studs and nuts or a single pinch bolt. Either way, support the front wheel, (Image 4) loosen the pinch/clamp hardware, and slide the axle out of the wheel. Catch the spacers before they roll under something, and lift the speedometer drive out of its recess in the wheel.

With the front wheel off, it’s time to get the fork legs out of the triple-trees. The tops of the Wide Glide legs have large, chromed bolts that thread into the actual spring caps and hold the legs into the top triple-tree; loosen (Image 5) and remove these bolts. Spray a small amount of silicone lubricant on the fork leg above the bottom triple-tree, loosen the bottom triple-tree pinch bolt, (Image 6) then slide the entire leg down only until the top of the leg is about halfway between the top and bottom triple-trees. Tighten the bottom triple-tree pinch bolt, then loosen the spring cap atop the leg; better to do this now than after the leg is removed, since the triple-trees make an excellent vise for holding the leg while you apply force to the cap. Once the cap is loosened (but don’t remove it), undo the pinch bolt and slide the leg out of the triple-trees. Do it all again on the other leg.
The other fork types simply have the tops of their tubes clamped into the triple-tree. Loosen the top triple-tree pinch bolt and then break the fork-cap assembly free, but do not yet unthread it past the O-ring on the cap. Again, spray a small amount of silicone lubricant on the fork leg above the bottom triple-tree, then release the tension on the lower triple-tree pinch bolt and (Image 7) slide the fork leg out of the trees. Do the same thing on the other leg.
You don’t yet want to completely remove the fork caps and springs; you’ll need the pressure of the spring pushing down on the damper rod inside the fork to help prevent the rod from spinning when you try to remove its securing bolt, which is up inside the bottom end of the leg. But you should drain the oil at this point. You can get most of the oil out of the Wide Glide fork without removing the cap and spring-retainer by tipping the legs upside-down and letting them drain while you clean up the rest of the front end. For the other fork types—or even for the 41mm style, if propping the legs upside-down isn’t convenient—remove the small drain screw on the backside of the lower leg and let the fluid run out.
You may find draining the oil more convenient with the fork still on the bike. If so, be particularly wary of bikes with air caps; make sure the fork is depressurized before you remove the oil-drain screw.

With the fork tube gently secured in a vise—aluminum, plastic or wood vise jaws are a real tube-saver—find a drift pin that’s at least as large in diameter as the head of the Allen bolt that holds the damper rod in place. Put the drift against the bolt head and give it a half-dozen spirited blows with a mallet. The shock wave this sends through the bolt and damper rod will make loosening the bolt a bit easier. Next, insert your 3/8-drive Allen wrench into the bolt and give it a few moderate taps with the mallet to ensure that it has fully seated in the hex socket. This is advisable because the hex socket is quite shallow and is easier to round out than you might think. Finally, loosen (Image 8) and remove the bolt. Fischer prefers to use a 3/8-drive T-handle on the Allen wrench (Image 9), but a ratchet or suitable breaker bar will do.
This bolt usually is very tight, so be prepared to exert a lot of force to break it loose. Some mechanics like to use air-impact drivers to free these bolts, but Fischer says he’s had much better success with the aforementioned method. In the event that the Allen socket gets rounded out, or you aren’t able to prevent the damper rod from turning, you’ll have to drill the head off of the Allen bolt to remove the damper rod. A small possibility, but it could happen. When the bolt finally is loose and you dig it out of the recess, make sure to capture the sealing washer hidden underneath.
Next, remove the spring cap (Image 10) and liberate the spring and any spacers. Do this cautiously, because the caps are preloaded by the spring and can be forcefully launched into the air—or your face—if you aren’t expecting them to suddenly come free. Tip the fork leg upside-down and work the damper rod out. There will also be a small spring under the head of the rod assembly; this is the top-out spring. Many fork lowering kits include shorter main springs and longer top-out springs. But don’t lose the stocker, even if you are going to lower the fork.
Separating the fork stanchion and lower leg is next. Pry up the rubber dust cover on the leg (Image 11) to reveal a spring clip. Remove the clip and slide all the pieces it retains up and off the stanchion tube. Then, use the lower leg as a slide hammer and, with moderate force, pull the fork seal up and out of the lower-leg recess (Image 12). Beneath it will be a thick metal spacer. Don’t lose that one, either.
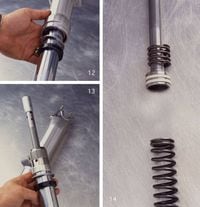
With the leg and tube separated, take a moment to inspect each (Image 13) for cracks and evidence of metal contamination. In particular, if the large bushing at the end of the stanchion tube shows signs of embedded metal, the bushing will have to be replaced. Thoroughly clean all of the pieces and let them air-dry, or use compressed air to blow out residual solvent. Take note of the location of the small, cone-shaped spacer—called the bottom-out cone—that fits over the bottom end of the damper rod. You need to make sure the cone is safely back on the end of the rod before reassembling the fork.
If your plan is merely to replace the seals, you can start the reassembly process now. If you are replacing the top-out spring on the damper rod (as part of a lowering kit) or installing a different rod, take a moment to check the new parts against the old ones. The springs should have the same (or very similar) inner and outer diameters, and the damper rod should be physically similar, although it may have a different number and size of damping holes.
Start the reassembly job by slipping the top-out spring down the shaft of the damper rod (Image 14), then slide the rod into the stanchion tube. Push the bottom-out cone over the end of the damper rod and then drop the whole assembly into the fork slider. Locate the threads on the end of the damper rod through the hole in the bottom of the fork slider and thread the bolt into place, making sure you haven’t forgotten the washer. For right now, only partially install the bolt, which will keep the damper rod from falling out and the bottom-out cone from coming loose inside the slider.
With the fork assembly supported in a vise, slip the fork-seal assembly—consisting of the upper bushing, the spacer ring and the seal itself—over the top of the stanchion tube. Before installing the spacer ring, note that it has a sharp edge on one side and a slightly rounded edge on the other; install the ring with the rounded side facing upward. Apply some silicone lube to the tube and be very careful working the seal over the open end of the stanchion; the seal’s part numbers should be facing up.
To secure the seal in its recess, you will need to make or borrow a seal tool. A section of PVC tubing with the approximate inner and outer diameters of the seal will work, but the specialized, metal seal drivers are much easier to use. Resist all temptations to use your hammer and drift to seat the seal.
Reinstall the main fork spring, paying attention to the orientation of any spacers or washers. Follow the recommendations of the lowering-kit manufacturer if the new parts aren’t the same as the stock items. Temporarily install the spring cap to help keep the damper rod from turning while you tighten the bolt at the bottom of the leg. Once that bolt is tight, refill the fork legs with the specified amount of oil. Check your service manual for the proper amount of oil for your bike; different models require dramatically different levels. With some lowering kits, you may be advised to use slightly less oil than normal.
Getting the fork legs back into the bike is essentially the reverse of the removal procedure; just make sure that all the parts are clean. For models with fork caps that protrude through the top of the upper triple-tree, set the leg height so the bottom edge of the cap bolt is level with the top edge of the tree. On 41mm forks, be sure to align each spring cap so that its two flat sides face directly to the left and right; if they’re not, any bolts that secure a windshield, turnsignals or other accessories on the outer sides of the top triple-tree could bottom-out on the caps before they’re fully tightened.
Reinstall the wheel, taking care that the spacers are in the correct locations and that you have hooked the speedo-drive tab into its locating hole on the hub. Slide the axle through, then tighten the axle nut before tightening the pinch bolt(s) on the opposite end of the axle. Leave that pinch hardware finger-tight while you reinstall the brake caliper and fender. Then take the bike off the jack and vigorously pump the front end up-and-down a few times; this will align the fork legs for the best ride and smoothest action. Now tighten the axle pinch bolts, and finish the job by double-checking the security of all the hardware.
During the first few rides, look for signs of leakage and listen for strange noises. With fresh oil and, perhaps, new springs, seals or bushings in the fork, you may be surprised how much better your old scoot feels. If you’ve done everything properly, you’ll have a bike that not only looks good but rides well, too.
/cloudfront-us-east-1.images.arcpublishing.com/octane/G4MG6OUCJNBSHIS2MVVOTPX65E.jpg)
/cloudfront-us-east-1.images.arcpublishing.com/octane/IIGGWFOTOJGB7DB6DGBXCCMTDY.jpg)
/cloudfront-us-east-1.images.arcpublishing.com/octane/QSTCM6AVEZA5JJBUXNIQ3DSOF4.jpg)
/cloudfront-us-east-1.images.arcpublishing.com/octane/U4I7G625B5DMLF2DVIJDFZVV6M.jpg)
/cloudfront-us-east-1.images.arcpublishing.com/octane/B6XD6LS6IVCQPIU6HXDJSM3FHY.jpg)
/cloudfront-us-east-1.images.arcpublishing.com/octane/ICL63FEDDRDTTMINYICCEYGMDA.jpg)
/cloudfront-us-east-1.images.arcpublishing.com/octane/FCGZHQXRBZFLBAPC5SDIQLVF4I.jpg)
/cloudfront-us-east-1.images.arcpublishing.com/octane/WNOB6LDOIFFHJKPSVIWDYUGOPM.jpg)

/cloudfront-us-east-1.images.arcpublishing.com/octane/X33NU3E525ECRHXLNUJN2FTRKI.jpg)
/cloudfront-us-east-1.images.arcpublishing.com/octane/6KKT5NNL2JAVBOXMZYS5ZO76YA.jpg)
/cloudfront-us-east-1.images.arcpublishing.com/octane/J5RKG5O455GMPGQRF2OG6LRT7A.jpg)
/cloudfront-us-east-1.images.arcpublishing.com/octane/GX2CIZKQVRH2TATDM26KFG2DAE.jpg)
/cloudfront-us-east-1.images.arcpublishing.com/octane/ZWIDYSAKQZHD5BHREMQILXJCGM.jpg)
/cloudfront-us-east-1.images.arcpublishing.com/octane/CYUHJZCTSJCH3MRAQEIKXK7SCQ.jpg)
/cloudfront-us-east-1.images.arcpublishing.com/octane/LKOFINY56FCXJCANJ5M7ZDQUBY.jpg)
/cloudfront-us-east-1.images.arcpublishing.com/octane/4NBPDACMWJH63JQYJVK3QRBDZI.jpg)
/cloudfront-us-east-1.images.arcpublishing.com/octane/KKHQHRR3FJGX7H2IPU6RALMWG4.jpg)

/cloudfront-us-east-1.images.arcpublishing.com/octane/5IOFS5JAE5FOXMNA23ZRAVVYUU.jpg)
/cloudfront-us-east-1.images.arcpublishing.com/octane/CGXQ3O2VVJF7PGTYR3QICTLDLM.jpg)

/cloudfront-us-east-1.images.arcpublishing.com/octane/OQVCJOABCFC5NBEF2KIGRCV3XA.jpg)
/cloudfront-us-east-1.images.arcpublishing.com/octane/OPVQ7R4EFNCLRDPSQT4FBZCS2A.jpg)