


As discussed in last month's MC Garage piece, "Springs, Explained" (see Making Sense Of Suspension, Part 1 here) those coiled lengths of wire we call springs are great at allowing your motorcycle's wheels to roll over and into irregularities on the road. But we have all witnessed an old car pogoing down the highway—that's what unchecked spring action looks like. Without damping to manage how quickly a spring absorbs and releases energy, it will continue to rise and fall like a boat on a strong swell.
While spring rate determines how far the suspension will move when you apply the throttle or brakes or hit a bump, damping is what determines how long it takes to get there. By applying a resistive force to the suspension components—fork or shock—it’s possible to finely control wheel travel. Damping has a huge influence on comfort, handling, and traction, and for those reasons many tuners consider it to be the most critical aspect of suspension setup.
And while spring force is dependent on how much the spring is compressed, damping force is determined by the velocity of the damper unit. Damping force is created by forcing oil through some sort of bottleneck. Forks and shocks contain different chambers, and as the suspension moves through its stroke oil is forced from one chamber to another through a restriction. Due to the oil’s thickness (or viscosity) there is resistance to flow through the restriction. And that, boys and girls, is where damping comes from.
The restriction used to create damping may be a circular hole (orifice-style damping) or a stack of very thin metal discs called shims that flex under pressure, allowing oil to flow past them. Orifice-style damping has some serious limitations (see “The Worst of Both Worlds” sidebar, right) and is less refined than shim-type damping, which can be fine-tuned to create a more desirable damping curve. We refer to damping as compression (a force that resists the compression of the damper unit) and rebound (which resists the spring’s natural tendency to extend once the bump has passed).
Since damping force is directly related to damper-unit velocity, it follows that bump shape plays a big role in how much damping force is created during the compression stroke. A smooth, gradual bump will create lower damper-unit speeds than a sudden, square-edged bump, even if the aberrations are the same height. How fast you’re going when you hit a bump also affects how quickly the suspension moves vertically, but don’t mistake high- and low-speed damping with vehicle speed—we’re always talking about the velocity of the damper components. During the rebound stroke, the rebound circuit only has to deal with the force of the spring.
When you have adjustable forks, the rebound adjuster (sometimes labeled “Ten” for tension) will normally be located on the top of the fork and the compression adjuster (often labeled “Comp”) will be on the bottom near the axle. Fork-top placement for both circuits is becoming more commonplace, as are fork legs dedicated to a single damping function—that is, one leg has just rebound-damping components and the other has compression. (Sometimes, there’s a single damping “pack” in just one leg; the other is just spring.) Inverted or upside-down forks are common on sportbikes and performance machines because they’re more resistant to flex, but the basic damping mechanisms are the same.
For the shock, rebound is usually adjusted at the bottom of the shock via a screw or rotating collar. The compression adjuster is typically at the top, and there are sometimes two: one for high-speed damping and one for low-speed damping.
Reducing compression damping will increase plushness, but pull out too much and the bike will pitch excessively when you apply the brakes and will bottom out more easily. Traction will suffer, too, since the wheel will want to continue rising even after it’s passed the crest of the bump.
If there’s too much compression damping, the suspension will not move quickly enough when a bump is encountered and the tires will compress and the bike will deflect upward, jolting the rider. (Stiff springs will feel similar, but we’re assuming proper spring rates and sag figures for the sake of this discussion.) A rough ride is uncomfortable but also bad for traction since the upward movement of the chassis unweights the wheels.
Lower levels of rebound damping will yield a plush ride, but the bike may feel loose and tend to bounce and wallow after encountering a bump or while cornering. Traction suffers here, too, since the suspension will extend too quickly post-bump, which forces the chassis upward and unweights the tires. Too much rebound can feel harsh, especially on very bumpy roads where the suspension may “pack up” as it fails to extend between successive hits.
Clearly, a good damping setup is a compromise (unless you have self-adjusting electronic suspension—more on that technology in a future issue). As a general rule, you want to run as little damping as possible: just enough compression damping to avoid excessive chassis pitch and bottoming and just enough rebound to keep the bike from bouncing.
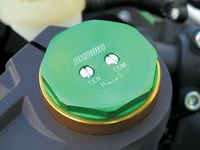
The adjusters—or “clickers” as they’re sometimes called due to the audible click certain varieties make as you turn them—allow you to make limited changes to damping rates. Even if your fork and shock use shim-type primary damping mechanisms, the adjusters change damping based on restricting a fixed orifice. The adjuster turns a needle valve, controlling the amount of oil that flows through orifice of the piston to control low-speed response.
Turning the screws in (clockwise) lowers the needle into the orifice, restricting flow and increasing damping. Backing the screw off opens the orifice and reduces damping. The low-speed adjustment affects the high-speed circuit since it’s still flowing fluid at higher damper velocities but not as greatly as it affects low-speed damping. Once damper velocity is high enough, the shim stacks take over and manage high-speed damping.
Get A Baseline With The Bounce Test
Since you already have your sag set (if not, see How To Set Rider Sag here), it's time to dial in your damping. Rebound damping is adjustable on all but the most basic suspension systems, so we'll start there.

The “bounce test” is a great way to get your rebound damping in the ballpark. Standing next to your bike with one hand on the seat and one hand on the tank, shove down on the bike firmly and quickly and then release it. You’re looking to see how fast it comes up, if it bounces at all, and if the fork and shock rebound are in unison.
If your bike has too much rebound damping it will return slowly and stop. If your bike has too little rebound damping (more likely the case), the suspension will shoot up rapidly, overshoot its free-sag position, and bounce once or twice.
Depending on how your bike responds to you shoving it around, you’ll want to add or remove rebound damping so that the bike rebounds quickly, overshoots equilibrium very slightly, and then immediately settles to its free sag position.
Keep in mind that if the oil in your fork or shock is worn out (it should be changed every 10,000 miles or so) you might not be able to achieve satisfactory damping. It’s also possible that your available adjustment range isn’t sufficient. Anytime an adjuster is maxed out, it’s a sure sign that your baseline setup is off and it’s time to see a specialist.
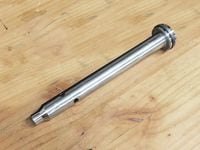
The Damper-Rod Dilemma
Damper-rod forks are common on budget bikes and vintage machines because they're simple and thus cheap to make. Unfortunately, they use orifice-style damping, which means they're a serious compromise.
In orifice-style damping, damping force increases with the square of velocity, which is to say that if damper-shaft velocity doubles, damping force quadruples. The result in an overly progressive damping curve. So the orifice size that works for low-speed damping might be downright brutal on high-speed hits, and holes that are sized correctly to offer good high-speed damping will give seriously squishy low-speed response.
If you have a damper-rod fork, don't despair. Race Tech's Gold Valve Emulators (racetech.com) are an affordable way to knock the quadratic function out of your damping curve.
Does this series whet your appetite for more information? We’ve just scratched the surface of all that is suspension, so if you want to learn more, check out the following books:
Race Tech's Motorcycle Suspension Bible (by Paul Thede and Lee Parks)
Sportbike Suspension Tuning (by Andrew Trevitt)
Motorcycle Dynamics (by Vittore Cossalter)
/cloudfront-us-east-1.images.arcpublishing.com/octane/7GJYDUIPXRGMTMQKN6ONYOLBOU.jpg)
/cloudfront-us-east-1.images.arcpublishing.com/octane/MUQLOVLL2ZDGFH25ILABNBXKTI.jpg)
/cloudfront-us-east-1.images.arcpublishing.com/octane/TNOU5DNE2BC57MFPMGN2EIDXAM.jpg)
/cloudfront-us-east-1.images.arcpublishing.com/octane/GTCXACQGJ5HAPDTGWUQKDEH44E.jpg)
/cloudfront-us-east-1.images.arcpublishing.com/octane/S35YGSEMEZB4BLTDJTSZPF4GLA.jpg)
/cloudfront-us-east-1.images.arcpublishing.com/octane/5UOT6HPX2JFMRJAX6EH45AR4MQ.jpg)
/cloudfront-us-east-1.images.arcpublishing.com/octane/OKWOJWAKP5EP3OACCRRWPCIX2Q.jpg)
/cloudfront-us-east-1.images.arcpublishing.com/octane/2WF3SCE3NFBQXLDNJM7KMXA45E.jpg)
/cloudfront-us-east-1.images.arcpublishing.com/octane/G4MG6OUCJNBSHIS2MVVOTPX65E.jpg)
/cloudfront-us-east-1.images.arcpublishing.com/octane/IIGGWFOTOJGB7DB6DGBXCCMTDY.jpg)
/cloudfront-us-east-1.images.arcpublishing.com/octane/QSTCM6AVEZA5JJBUXNIQ3DSOF4.jpg)
/cloudfront-us-east-1.images.arcpublishing.com/octane/U4I7G625B5DMLF2DVIJDFZVV6M.jpg)
/cloudfront-us-east-1.images.arcpublishing.com/octane/B6XD6LS6IVCQPIU6HXDJSM3FHY.jpg)
/cloudfront-us-east-1.images.arcpublishing.com/octane/ICL63FEDDRDTTMINYICCEYGMDA.jpg)
/cloudfront-us-east-1.images.arcpublishing.com/octane/FCGZHQXRBZFLBAPC5SDIQLVF4I.jpg)
/cloudfront-us-east-1.images.arcpublishing.com/octane/WNOB6LDOIFFHJKPSVIWDYUGOPM.jpg)

/cloudfront-us-east-1.images.arcpublishing.com/octane/X33NU3E525ECRHXLNUJN2FTRKI.jpg)
/cloudfront-us-east-1.images.arcpublishing.com/octane/6KKT5NNL2JAVBOXMZYS5ZO76YA.jpg)
/cloudfront-us-east-1.images.arcpublishing.com/octane/J5RKG5O455GMPGQRF2OG6LRT7A.jpg)
/cloudfront-us-east-1.images.arcpublishing.com/octane/GX2CIZKQVRH2TATDM26KFG2DAE.jpg)
/cloudfront-us-east-1.images.arcpublishing.com/octane/ZWIDYSAKQZHD5BHREMQILXJCGM.jpg)
/cloudfront-us-east-1.images.arcpublishing.com/octane/CYUHJZCTSJCH3MRAQEIKXK7SCQ.jpg)
/cloudfront-us-east-1.images.arcpublishing.com/octane/LKOFINY56FCXJCANJ5M7ZDQUBY.jpg)