


/cloudfront-us-east-1.images.arcpublishing.com/octane/2APQDLVOG7WKBUVP6B5JGNIYCY.jpg)
Wrist: Zack Courts
MSRP (2015): $16,490
Miles: 2841
MPG: 33
Mods: Hotbodies Racing bodywork
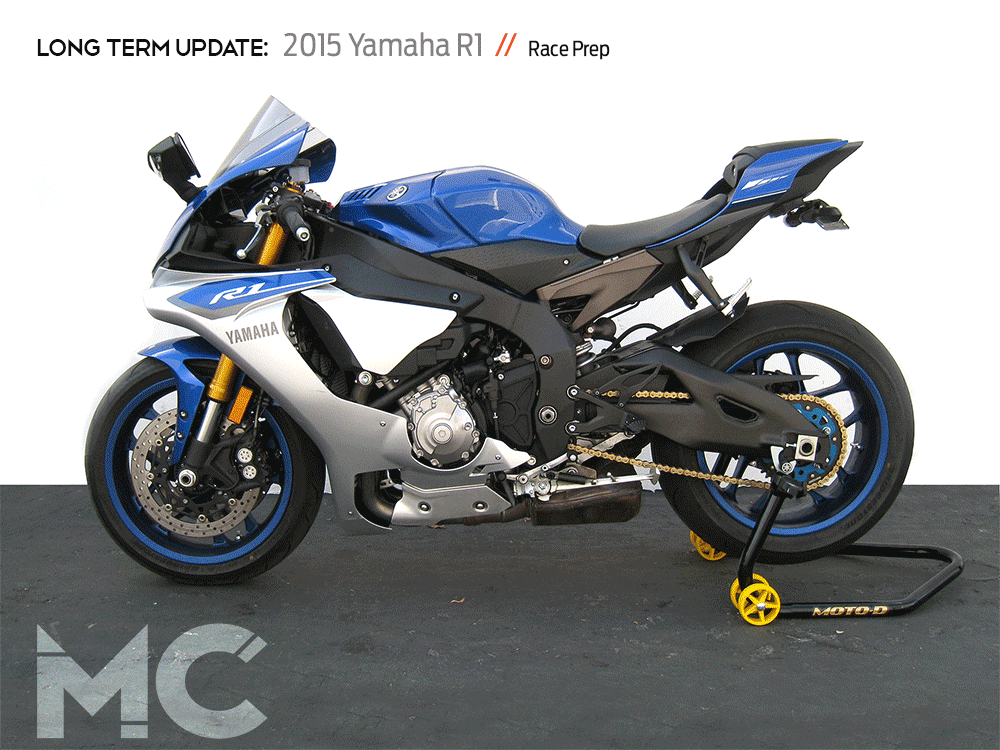
As I set off on this journey to prepare this long-term Yamaha YZF-R1 for racing, my colleague and officemate Ari Henning warned me that it would be more time consuming than I thought. He was right. I eventually succeeded, and pitted my skills and the R1’s base-level KYB suspension against a fleet of Southern California club racers, but before I did that I had to do this...

Whenever I prepare a bike for the track, adding the bodywork always feels like the fun part. This is what makes the motorcycle look like a track bike, after all. But if you’ve gone through the trouble of doing this you know it can be a serious pain. So, for this project I wanted to be as easy as possible. Hotbodies Racing to rescue! I chose the Color Form kit for my R1, and in putting it on the bike and using it I learned a few things. Here are my tips:
1) Go Color Form
What drew me to Hotbodies for this task is the company's Color Form process, whereby the color is impregnated into the bodywork using a proprietary resin and the finished product is essentially already painted. I ordered the full kit (hotbodiesracing.com; $750), which includes an upper and lower fairing, seat/tail, and front fender. If you were really racing on a budget you could probably get away with a stock front fender and even a stock tail, but I wanted the race seat and figured the fender would match better if it came from the same place.
2) Prepare Your Machine
Before you add bodywork, obviously, you have to take off the street stuff. And if you're installing racing bodywork, you should be installing at least a little bit of crash protection for your trusty steed. For more info on my process for stripping the stock body off this R1 and installing frame sliders and case covers, click HERE. As for the mounting process, plan a clean space with plenty of room around your stripped R1. Bodywork is big and awkward.
3) Get Hardware Ahead
There are suggested places on the Hotbodies pieces to drill holes and set hardware, but mock stuff up before you punch any holes. Also, make sure to gather fasteners together to pin the bodywork properly to the subframes. I used a standard M6 bolt (1.00 thread pitch) to run through one set of mounting holes for the mirrors and two of the locknuts from the stock mirror assembly. You'll want the same size bolts to hold the front of the seat piece. Bonus points for low-profile cap bolts so that you don't need a washer, but be wary of how much room the Hotbodies mold allows for pinning the seat to the front of the subframe.
4) Measure Twice, Drill Once
The area of most frustration for me in mounting up this bodywork is the overlap between the upper and lower fairings. The lower fairing can mount up entirely to stock mounts using the stock dzus fasteners. So if the fit isn't just right, take the time to adjust the brackets to meet where you want them to—that will make fitment a thousand times easier every time you drop the belly pan off the bottom of the bike. Lastly, if you need to trim a corner off an inside-facing piece, fear not! The Color Form fiberglass responds just fine to it (though I recommend sanding or filing sharp edges to keep from scratching anything it touches).
5) Beware of the Heat
I left the stock exhaust on, but removed all of the standard heat shields (except the one farthest back, near the slip-on) to create more space. Even so, the massive muffler under the R1's engine makes it a little tricky to get the lower fairing to sit up high enough that it meets well with the upper. If you've got an aftermarket pipe, you're in luck—that will create more room under the bike and allow the two pieces to get closer. If you're using the stock pipe, keep in mind that when the bike runs it'll cook the inside of bodywork. This means stickers or number plates can bubble or peel. Leave a little extra room or put some adhesive heat shield inside.

I’ve used the R1 a few times at the track and the bodywork has been great. I’ve gotten lots of compliments on it, and I can’t tell you how happy I am that I didn’t have to worry about painting it! Drill holes, apply stickers, and go racing!
/cloudfront-us-east-1.images.arcpublishing.com/octane/7GJYDUIPXRGMTMQKN6ONYOLBOU.jpg)
/cloudfront-us-east-1.images.arcpublishing.com/octane/MUQLOVLL2ZDGFH25ILABNBXKTI.jpg)
/cloudfront-us-east-1.images.arcpublishing.com/octane/TNOU5DNE2BC57MFPMGN2EIDXAM.jpg)
/cloudfront-us-east-1.images.arcpublishing.com/octane/GTCXACQGJ5HAPDTGWUQKDEH44E.jpg)
/cloudfront-us-east-1.images.arcpublishing.com/octane/S35YGSEMEZB4BLTDJTSZPF4GLA.jpg)
/cloudfront-us-east-1.images.arcpublishing.com/octane/5UOT6HPX2JFMRJAX6EH45AR4MQ.jpg)
/cloudfront-us-east-1.images.arcpublishing.com/octane/OKWOJWAKP5EP3OACCRRWPCIX2Q.jpg)
/cloudfront-us-east-1.images.arcpublishing.com/octane/2WF3SCE3NFBQXLDNJM7KMXA45E.jpg)
/cloudfront-us-east-1.images.arcpublishing.com/octane/G4MG6OUCJNBSHIS2MVVOTPX65E.jpg)
/cloudfront-us-east-1.images.arcpublishing.com/octane/IIGGWFOTOJGB7DB6DGBXCCMTDY.jpg)
/cloudfront-us-east-1.images.arcpublishing.com/octane/QSTCM6AVEZA5JJBUXNIQ3DSOF4.jpg)
/cloudfront-us-east-1.images.arcpublishing.com/octane/U4I7G625B5DMLF2DVIJDFZVV6M.jpg)
/cloudfront-us-east-1.images.arcpublishing.com/octane/B6XD6LS6IVCQPIU6HXDJSM3FHY.jpg)
/cloudfront-us-east-1.images.arcpublishing.com/octane/ICL63FEDDRDTTMINYICCEYGMDA.jpg)
/cloudfront-us-east-1.images.arcpublishing.com/octane/FCGZHQXRBZFLBAPC5SDIQLVF4I.jpg)
/cloudfront-us-east-1.images.arcpublishing.com/octane/WNOB6LDOIFFHJKPSVIWDYUGOPM.jpg)
/cloudfront-us-east-1.images.arcpublishing.com/octane/X33NU3E525ECRHXLNUJN2FTRKI.jpg)
/cloudfront-us-east-1.images.arcpublishing.com/octane/6KKT5NNL2JAVBOXMZYS5ZO76YA.jpg)
/cloudfront-us-east-1.images.arcpublishing.com/octane/J5RKG5O455GMPGQRF2OG6LRT7A.jpg)
/cloudfront-us-east-1.images.arcpublishing.com/octane/GX2CIZKQVRH2TATDM26KFG2DAE.jpg)
/cloudfront-us-east-1.images.arcpublishing.com/octane/ZWIDYSAKQZHD5BHREMQILXJCGM.jpg)
/cloudfront-us-east-1.images.arcpublishing.com/octane/CYUHJZCTSJCH3MRAQEIKXK7SCQ.jpg)
/cloudfront-us-east-1.images.arcpublishing.com/octane/LKOFINY56FCXJCANJ5M7ZDQUBY.jpg)