


WRIST: Ari Henning
MSRP (2015): $5,499
MILES: 2,200
MPG: 53
MODS: Headlight adjustment
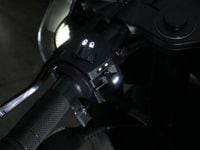
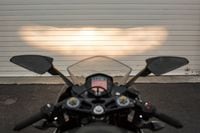
Besides totally throwing off my internal clock, the end of Daylight Savings Time means I'm riding home from work after the sun has set. Piloting the RC390 after dark offers a few treats not experienced during daylight hours, like basking in the orange glow of the KTM's LCD dash or laughing at the luxury of LED-illuminated switch clusters. Not even $25,000 super-tourers have that!
Another feature that sets the RC390 apart from its Japanese competition (besides an inverted fork, radial-mount front brake, and switchable ABS) and becomes pronounced during night rides is the bike’s halogen projector headlights.
Projector headlights use an elliptical reflector and a lens to focus and project light onto the road. This type of headlight has a very clean beam cutoff, with nearly no scattering at the edges of the beam. That precise beam is very effective at illuminating the road, but because it’s so focused it’s even more important that it is aimed correctly.
I received a letter from a reader with an RC390, have seen a few comments on the RC390 forums, and have noticed it myself—the RC390’s low beam isn’t aimed right. Most folks say it’s aimed too high, with the result being a flickering effect as that crisp beam arcs up and down and bounces back off reflective road signs as the bike pitches over bumps. The strobe-like reflection is evident to me, and I imagine that to oncoming traffic and anyone I’m following it looks like I’m constantly flashing my high beams as the edge of headlight beam passes over their field of vision.

I think the squishy shock (as opposed to improper adjustment at the factory) is to blame for the skyward aim, but in any case, adjusting the aim is easy. There’s a slotted metal adjuster just below and outboard each light housing (see photo above), one for the low beam (left) and high beam (right).
Turning the screw counter-clockwise lowers the beam and rotating it clockwise raises it. To adjust my low beam I parked the RC on a rear stand in front of a garage door with horizontal slats and noted where the upper edge of the beam cutoff was, then lowered the beam a few inches. I ended up taking two turns out of the adjuster, and on my ride home the upper cut off rode right below the side-view mirrors of the cars in front of me. Perfect. No more annoying flickering from my perspective, and no more annoying strobing for those in front of me.
/cloudfront-us-east-1.images.arcpublishing.com/octane/FZXHNOQRNVA3BIDWAF46TSX6I4.jpg)
/cloudfront-us-east-1.images.arcpublishing.com/octane/JRSFLB2645FVNOQAZCKC5LNJY4.jpg)
/cloudfront-us-east-1.images.arcpublishing.com/octane/ITNLTIU5QZARHO733XP4EBTNVE.jpg)
/cloudfront-us-east-1.images.arcpublishing.com/octane/VZZXJQ6U3FESFPZCBVXKFSUG4A.jpg)
/cloudfront-us-east-1.images.arcpublishing.com/octane/QCZEPHQAMRHZPLHTDJBIJVWL3M.jpg)
/cloudfront-us-east-1.images.arcpublishing.com/octane/HXOUJXQWA5HBHGRO3EMJIGFMVI.jpg)

/cloudfront-us-east-1.images.arcpublishing.com/octane/3TIWWRV4JBBOLDVGRYECVVTA7Y.jpg)
/cloudfront-us-east-1.images.arcpublishing.com/octane/KIX5O23D5NAIBGFXBN3327DKZU.jpg)
/cloudfront-us-east-1.images.arcpublishing.com/octane/7GJYDUIPXRGMTMQKN6ONYOLBOU.jpg)
/cloudfront-us-east-1.images.arcpublishing.com/octane/MUQLOVLL2ZDGFH25ILABNBXKTI.jpg)
/cloudfront-us-east-1.images.arcpublishing.com/octane/TNOU5DNE2BC57MFPMGN2EIDXAM.jpg)
/cloudfront-us-east-1.images.arcpublishing.com/octane/GTCXACQGJ5HAPDTGWUQKDEH44E.jpg)
/cloudfront-us-east-1.images.arcpublishing.com/octane/S35YGSEMEZB4BLTDJTSZPF4GLA.jpg)
/cloudfront-us-east-1.images.arcpublishing.com/octane/5UOT6HPX2JFMRJAX6EH45AR4MQ.jpg)
/cloudfront-us-east-1.images.arcpublishing.com/octane/OKWOJWAKP5EP3OACCRRWPCIX2Q.jpg)
/cloudfront-us-east-1.images.arcpublishing.com/octane/2WF3SCE3NFBQXLDNJM7KMXA45E.jpg)
/cloudfront-us-east-1.images.arcpublishing.com/octane/G4MG6OUCJNBSHIS2MVVOTPX65E.jpg)
/cloudfront-us-east-1.images.arcpublishing.com/octane/IIGGWFOTOJGB7DB6DGBXCCMTDY.jpg)
/cloudfront-us-east-1.images.arcpublishing.com/octane/QSTCM6AVEZA5JJBUXNIQ3DSOF4.jpg)
/cloudfront-us-east-1.images.arcpublishing.com/octane/U4I7G625B5DMLF2DVIJDFZVV6M.jpg)
/cloudfront-us-east-1.images.arcpublishing.com/octane/B6XD6LS6IVCQPIU6HXDJSM3FHY.jpg)
/cloudfront-us-east-1.images.arcpublishing.com/octane/ICL63FEDDRDTTMINYICCEYGMDA.jpg)
/cloudfront-us-east-1.images.arcpublishing.com/octane/FCGZHQXRBZFLBAPC5SDIQLVF4I.jpg)