


We would all rather ride than drive, but sometimes, whether it’s a trackday, a service appointment, or a cross-country move, the only way to get your bike to its destination is to haul it there. As with anything in life, there are good ways to load and secure your bike just as there are bad ones. If you want to see how not to load and haul a bike, search YouTube for “motorcycle loading fail” and try not to spit coffee on your computer screen. To learn how to do it right, read on.
Loading is the first hurdle; the secret is to lower the bar. Get the ramp as level as possible with the truck bed or trailer to avoid high-centering the bike halfway up. This is especially important for long-wheelbase, low-slung cruisers. Drop a pickup’s tailgate past horizontal if you can, and tilt the trailer so the rear end is low. A useful strategy is to place the pickup’s rear wheels into the gutter in front of your house; this will naturally reduce loading height. You would be amazed how a drop of half a foot at the truck’s axle will ease loading. But whatever you do, be sure your loading platform is secure. Unhitching the trailer will cause more problems than dropping the loading height will cure.
Before you even get the bike near the ramp, be prepared in the truck bed, van interior, or trailer platform. Make sure the chock is securely mounted in the correct place—centered on your tie-down points and far enough forward so you can get the tailgate or ramp closed—and have your tie-downs and “soft ties” ready to go. More on those choices in a moment.
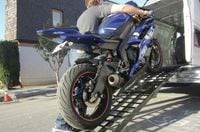
Do not, for the love of all your bodywork, try to ride the bike up the ramp. Experienced loaders may be able to do it without mayhem, but this method is just so much riskier. Other than just pushing, you have two options. First, have a friend help you push the bike up the ramp. Second, run the bike up under power.
For the friend method, advise your buddy that his job is forward motion only. He is not to help you balance the bike unless you explicitly ask for assistance. This happens all the time: The guy “driving” is trying to balance the bike and naturally draws it toward him, which puts it slightly over center. The other guy, trying to help, attempts to right the bike; in doing so, he’s dragging it out of his friend’s hands. Whoever is strongest will determine which side of the bike gets scratched. Reinforce, also, that your friend should continue to push until the bike is in the chock or you cry uncle.
Running the bike in under power is trickier. Before you start, be sure you can make the step from the ground to the bed easily. If you can’t, get a stool or stand. The last thing you want is to miss the step and have the bike charge into the truck under power. Also, be absolutely sure the ramp is secured to the truck or trailer via a peg or a tie-down strap. You don’t want it shooting out from beneath the rear tire just as the front hits the bed. Yes, it’s happened, and YouTube can prove it.
Start the bike and put it into first gear. For most sportbikes and lighter machines, you can simply slip the clutch and run up the ramp on the idle circuit. There is no need to rev the engine like crazy, since this only makes it difficult to find just the right amount of thrust to ascend the ramp. Practice makes this task easier, but it’s important to take your time. Balance the speed up the ramp with clutch and throttle, cover the front brake with one or two fingers, and be prepared to tap the kill switch. Remember, you’re standing beside the bike for this operation, not straddling it.
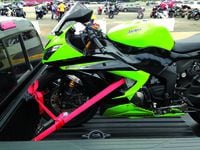
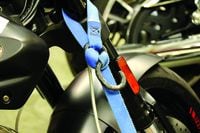
Now that the bike’s in the bed, tie it down securely. Even a capturing/over-center wheel chock is not enough. Ideally you want four tie-downs, two in front and two in the rear, at 45-degree angles from the bike to the anchor point, to resist both fore-and-aft and side-to-side motion. If you can gain access to the lower triple clamp, place your soft ties around the clamp just inboard of the fork tubes. Look for places where the soft ties or main tie-down straps can make contact with the frame, suspension, or bodywork. You want to find a way to avoid any contact if you can, though the geometry of your tie-down points can make that difficult. Second choice for a tie-down location on the bike is the inside of the handlebar or bar mount. The same caveats apply regarding tie-downs touching the paint or chassis. If all else fails, you can tie down to the handgrips, but we always prefer a cross-strap tie-down system that distributes the load across the bar or clip-ons rather than concentrating them at each grip.
It’s important to get the front tie-downs secure since they’re carrying the bulk of the load. Any tie-down points near the back of the bike are largely for redundancy and to keep the back end of the bike from skipping about the truck bed. Make sure all four ties are pulling forward; if the rears pull aft they will only try to yank the bike out of the wheel chock.
How tight should the tie-downs be? Pretty damn tight, actually. First of all, forget what you were told about blowing fork seals. For streetbikes, this just isn’t an issue. The risk of tying down too tightly is doing damage to whatever you’re tying to on the bike. The risk of not tying down tightly enough is a bike that shoots out of its chock or slips the tie-down ring. Gravity and the truck’s momentum will do the rest.
Remember how you compressed the suspension to get the tie-downs snug when you hooked them up? You’re probably going to have to compress it just a little more to get them to release. When that happens the bike is going to lunge suddenly to one side, so be ready. Backing down the ramp is harder than going up because even though gravity is on your side this time, you can’t easily stop and go back up and start over if something’s not right. Make sure the ramp is lined up, don’t turn the front wheel, and know where you’re going to step. Here’s where your buddies really earn the beer you promised them for helping.
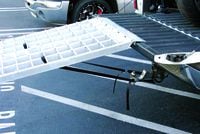
Start with a motorcycle ramp—a real one, not a 2x4 or a sheet of plywood. Check the weight rating; a ramp made for dirt bikes might fold under the weight of a dresser. The ramp should have a lip on one end that extends into the truck bed or trailer rail to keep it from falling off. Raised sides help guide the bike up and down, and a cleated surface adds traction.
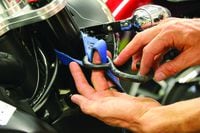
Rope is fine for tying down the bike if you’re crossing a swollen river in Africa and the owner of the dugout canoe you’re hitching a ride in doesn’t have anything better. For every other scenario get real tie-downs. They come in two types: cam buckle and ratcheting. With the cam buckle you compress the suspension while pulling out the slack, whereas the ratcheting mechanism does the tightening, pulling out the slack, and compressing the suspension at the same time. Either type needs stout, rubber- or plastic-coated hooks on both ends; bonus points for a way to secure the loose ends and prevent them from flapping around in the breeze. If there’s no way to attach the hooks to a bike with narrow clip-on handlebars without the tie-downs coming in contact with plastic or painted parts, use extension straps.
Most pickups have stake holes in the sides of the bed you can use for the outboard tie-down hooks. If yours doesn’t you’ll need to bolt some anchor points to the bed floor. Spring-loaded folding hooks lie flat when you’re not using them. A wheel chock is essential since it keeps the front wheel from turning and causing one of your tie-downs to go slack. It’s important to have the tie-down points equidistant from the center of the chock to prevent cocking of the front wheel.
/cloudfront-us-east-1.images.arcpublishing.com/octane/7GJYDUIPXRGMTMQKN6ONYOLBOU.jpg)
/cloudfront-us-east-1.images.arcpublishing.com/octane/MUQLOVLL2ZDGFH25ILABNBXKTI.jpg)
/cloudfront-us-east-1.images.arcpublishing.com/octane/TNOU5DNE2BC57MFPMGN2EIDXAM.jpg)
/cloudfront-us-east-1.images.arcpublishing.com/octane/GTCXACQGJ5HAPDTGWUQKDEH44E.jpg)
/cloudfront-us-east-1.images.arcpublishing.com/octane/S35YGSEMEZB4BLTDJTSZPF4GLA.jpg)
/cloudfront-us-east-1.images.arcpublishing.com/octane/5UOT6HPX2JFMRJAX6EH45AR4MQ.jpg)
/cloudfront-us-east-1.images.arcpublishing.com/octane/OKWOJWAKP5EP3OACCRRWPCIX2Q.jpg)
/cloudfront-us-east-1.images.arcpublishing.com/octane/2WF3SCE3NFBQXLDNJM7KMXA45E.jpg)
/cloudfront-us-east-1.images.arcpublishing.com/octane/G4MG6OUCJNBSHIS2MVVOTPX65E.jpg)
/cloudfront-us-east-1.images.arcpublishing.com/octane/IIGGWFOTOJGB7DB6DGBXCCMTDY.jpg)
/cloudfront-us-east-1.images.arcpublishing.com/octane/QSTCM6AVEZA5JJBUXNIQ3DSOF4.jpg)
/cloudfront-us-east-1.images.arcpublishing.com/octane/U4I7G625B5DMLF2DVIJDFZVV6M.jpg)
/cloudfront-us-east-1.images.arcpublishing.com/octane/B6XD6LS6IVCQPIU6HXDJSM3FHY.jpg)
/cloudfront-us-east-1.images.arcpublishing.com/octane/ICL63FEDDRDTTMINYICCEYGMDA.jpg)
/cloudfront-us-east-1.images.arcpublishing.com/octane/FCGZHQXRBZFLBAPC5SDIQLVF4I.jpg)
/cloudfront-us-east-1.images.arcpublishing.com/octane/WNOB6LDOIFFHJKPSVIWDYUGOPM.jpg)

/cloudfront-us-east-1.images.arcpublishing.com/octane/X33NU3E525ECRHXLNUJN2FTRKI.jpg)
/cloudfront-us-east-1.images.arcpublishing.com/octane/6KKT5NNL2JAVBOXMZYS5ZO76YA.jpg)
/cloudfront-us-east-1.images.arcpublishing.com/octane/J5RKG5O455GMPGQRF2OG6LRT7A.jpg)
/cloudfront-us-east-1.images.arcpublishing.com/octane/GX2CIZKQVRH2TATDM26KFG2DAE.jpg)
/cloudfront-us-east-1.images.arcpublishing.com/octane/ZWIDYSAKQZHD5BHREMQILXJCGM.jpg)
/cloudfront-us-east-1.images.arcpublishing.com/octane/CYUHJZCTSJCH3MRAQEIKXK7SCQ.jpg)
/cloudfront-us-east-1.images.arcpublishing.com/octane/LKOFINY56FCXJCANJ5M7ZDQUBY.jpg)