


/cloudfront-us-east-1.images.arcpublishing.com/octane/LKUQMVHHJ4SDA6US34KHRLAAJA.jpg)
Buying a new Harley-Davidson with the intent of keeping it stock is rare. I don't expect Roadster owners are any different, but instead of the usual cruiser treatment most Sportsters get, upgrades made to this model will more likely reflect its sportier character.
The Roadster's lower handlebars add an aggressive look, but the mid-location of the foot controls feels like a compromise, both in looks and in comfort. I suspect the ability to accommodate a passenger has something to do with this setup. H-D's Rear Set Foot Controls (h-d.com; $700) relocate the rider pegs to the passenger-peg location for a more natural riding posture with low bars.
To test whether or not I’d be okay with this modification, I hopped on the bike, kicked down the rear pegs, and went for a ride. For the next few days, I did this front-to-rear-footpeg shuffle and actually found the rearward position more comfortable. The only trade-off is the loss of passenger pegs, which, for me, really isn’t a deal-breaker since I’m also installing a solo seat and a café tailsection.
The rearset kit can be ordered separately, but I bundled it with two other pieces from Harley's Café Custom Accessories package, the Café Custom Tail Section (unpainted, $550; Vivid Black, $700) and the Sportster Clubman Handlebar ($200). No cutting or drilling is required, but several parts get shelved so you'll want to save them if you plan to de-café the Roadster at some point in the future.
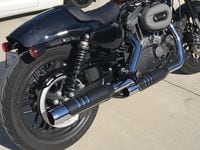
Installation of the rearsets requires removal of the exhaust system. I advise reserving a weekend for the installation in a spot where, if necessary, you can leave the bike overnight. Instructions recommend having a factory service manual on hand. I managed without, but if you are unfamiliar with Sportster anatomy, a manual is a good investment.
The handlebar swap took less than an hour, while the Café Tail took about two and required removal of the stock seat and rear fender. The H-D rearsets were a bit more challenging for me, as I had some difficulty getting the pegs to slip into the kit’s brackets. I actually had to force them in place with a pair of pliers, something I don’t expect to do with parts that come from the factory.
Aside from that hitch, the rest of the parts fit nicely. Next, I'll order paint from ColorRite to match the new tailpiece to the gas tank. That's tomorrow though. Today, I ride!
/cloudfront-us-east-1.images.arcpublishing.com/octane/MUQLOVLL2ZDGFH25ILABNBXKTI.jpg)
/cloudfront-us-east-1.images.arcpublishing.com/octane/TNOU5DNE2BC57MFPMGN2EIDXAM.jpg)
/cloudfront-us-east-1.images.arcpublishing.com/octane/GTCXACQGJ5HAPDTGWUQKDEH44E.jpg)
/cloudfront-us-east-1.images.arcpublishing.com/octane/S35YGSEMEZB4BLTDJTSZPF4GLA.jpg)
/cloudfront-us-east-1.images.arcpublishing.com/octane/5UOT6HPX2JFMRJAX6EH45AR4MQ.jpg)
/cloudfront-us-east-1.images.arcpublishing.com/octane/OKWOJWAKP5EP3OACCRRWPCIX2Q.jpg)
/cloudfront-us-east-1.images.arcpublishing.com/octane/2WF3SCE3NFBQXLDNJM7KMXA45E.jpg)
/cloudfront-us-east-1.images.arcpublishing.com/octane/G4MG6OUCJNBSHIS2MVVOTPX65E.jpg)
/cloudfront-us-east-1.images.arcpublishing.com/octane/IIGGWFOTOJGB7DB6DGBXCCMTDY.jpg)
/cloudfront-us-east-1.images.arcpublishing.com/octane/QSTCM6AVEZA5JJBUXNIQ3DSOF4.jpg)
/cloudfront-us-east-1.images.arcpublishing.com/octane/U4I7G625B5DMLF2DVIJDFZVV6M.jpg)
/cloudfront-us-east-1.images.arcpublishing.com/octane/B6XD6LS6IVCQPIU6HXDJSM3FHY.jpg)
/cloudfront-us-east-1.images.arcpublishing.com/octane/ICL63FEDDRDTTMINYICCEYGMDA.jpg)
/cloudfront-us-east-1.images.arcpublishing.com/octane/FCGZHQXRBZFLBAPC5SDIQLVF4I.jpg)
/cloudfront-us-east-1.images.arcpublishing.com/octane/WNOB6LDOIFFHJKPSVIWDYUGOPM.jpg)
/cloudfront-us-east-1.images.arcpublishing.com/octane/X33NU3E525ECRHXLNUJN2FTRKI.jpg)
/cloudfront-us-east-1.images.arcpublishing.com/octane/6KKT5NNL2JAVBOXMZYS5ZO76YA.jpg)
/cloudfront-us-east-1.images.arcpublishing.com/octane/J5RKG5O455GMPGQRF2OG6LRT7A.jpg)
/cloudfront-us-east-1.images.arcpublishing.com/octane/GX2CIZKQVRH2TATDM26KFG2DAE.jpg)
/cloudfront-us-east-1.images.arcpublishing.com/octane/ZWIDYSAKQZHD5BHREMQILXJCGM.jpg)
/cloudfront-us-east-1.images.arcpublishing.com/octane/CYUHJZCTSJCH3MRAQEIKXK7SCQ.jpg)
/cloudfront-us-east-1.images.arcpublishing.com/octane/LKOFINY56FCXJCANJ5M7ZDQUBY.jpg)
/cloudfront-us-east-1.images.arcpublishing.com/octane/4NBPDACMWJH63JQYJVK3QRBDZI.jpg)