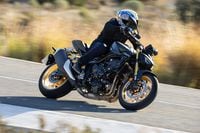
Every bike should be fitted to its rider. Even if your motorcycle has no apparent allowances, you can still make some basic adjustments that will improve your riding comfort and the ease with which you manage your bike’s controls. We’ll show you how.
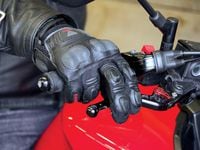
1. Start with your most-used controls: the clutch lever and front brake lever. The angle of the controls should be such that you can comfortably cover the levers with two fingers. To establish a starting position, sit upright (as you would when braking hard), and form a straight line with your arms that extends from your shoulders to your fingertips. You want your levers to be right under your fingers in this position. Any significant angle in your wrist will make it difficult to cover the controls and reduce your effective pull strength. To adjust the lever angle, loosen the pinch bolts and rotate the controls to the desired position. Watch out for interference with bodywork. Some controls are pinned or have limited adjustment, so be aware and don't force the issue.
2. The reach to the levers is nearly as important as their angle. If your bike came with adjustable-reach levers, turn the barrel adjuster or lever to position the blades at a distance that is comfortable for you. Preferences vary widely—it's a very subjective thing. If your bike's levers aren't adjustable (most clutch levers aren't), it might be worth investing in an aftermarket set like these.

3. Seeing what's around you in traffic is critical, so take a moment to check your mirrors before each ride. Position your mirrors so you can see as much of the lane behind and beside you as possible. All mirrors have positionable glass, and most have at least one other articulation—stalk-mounted mirrors can be rotated around their bases by loosening the collar nut, and fairing-mounted mirrors typically pivot forward and back.
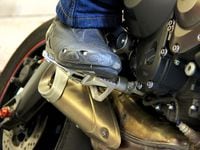
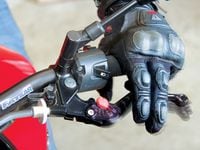
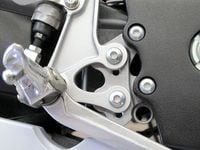
4. The shifter and rear-brake lever height (and sometimes reach) is adjustable on nearly all motorcycles. As with the front brake lever, you want the rear brake pedal to be positioned just beneath your toes in your normal riding position. To adjust either pedal's height, loosen the locknut(s) that secure the linkage, and turn the shaft to attain the desired pedal height.
5. Many bikes offer adjustable seat, handlebar, and footpeg positions. If your bike is one of them, take some time to experiment with the various options to see what suits you best. A half-inch here or there can make a world of difference. Even an ostensibly nonadjustable handlebar can be rolled forward and back in the clamps, allowing you to open up or tighten up your reach to the grips.
We’ve provided a quick demonstration video below that shows how to adjust controls for safe and comfortable riding. A perfect how-to for new riders.
/cloudfront-us-east-1.images.arcpublishing.com/octane/OKWOJWAKP5EP3OACCRRWPCIX2Q.jpg)
/cloudfront-us-east-1.images.arcpublishing.com/octane/2WF3SCE3NFBQXLDNJM7KMXA45E.jpg)
/cloudfront-us-east-1.images.arcpublishing.com/octane/G4MG6OUCJNBSHIS2MVVOTPX65E.jpg)
/cloudfront-us-east-1.images.arcpublishing.com/octane/IIGGWFOTOJGB7DB6DGBXCCMTDY.jpg)
/cloudfront-us-east-1.images.arcpublishing.com/octane/QSTCM6AVEZA5JJBUXNIQ3DSOF4.jpg)
/cloudfront-us-east-1.images.arcpublishing.com/octane/U4I7G625B5DMLF2DVIJDFZVV6M.jpg)
/cloudfront-us-east-1.images.arcpublishing.com/octane/B6XD6LS6IVCQPIU6HXDJSM3FHY.jpg)
/cloudfront-us-east-1.images.arcpublishing.com/octane/ICL63FEDDRDTTMINYICCEYGMDA.jpg)
/cloudfront-us-east-1.images.arcpublishing.com/octane/FCGZHQXRBZFLBAPC5SDIQLVF4I.jpg)
/cloudfront-us-east-1.images.arcpublishing.com/octane/WNOB6LDOIFFHJKPSVIWDYUGOPM.jpg)
/cloudfront-us-east-1.images.arcpublishing.com/octane/X33NU3E525ECRHXLNUJN2FTRKI.jpg)
/cloudfront-us-east-1.images.arcpublishing.com/octane/6KKT5NNL2JAVBOXMZYS5ZO76YA.jpg)
/cloudfront-us-east-1.images.arcpublishing.com/octane/J5RKG5O455GMPGQRF2OG6LRT7A.jpg)
/cloudfront-us-east-1.images.arcpublishing.com/octane/GX2CIZKQVRH2TATDM26KFG2DAE.jpg)
/cloudfront-us-east-1.images.arcpublishing.com/octane/ZWIDYSAKQZHD5BHREMQILXJCGM.jpg)
/cloudfront-us-east-1.images.arcpublishing.com/octane/CYUHJZCTSJCH3MRAQEIKXK7SCQ.jpg)
/cloudfront-us-east-1.images.arcpublishing.com/octane/LKOFINY56FCXJCANJ5M7ZDQUBY.jpg)
/cloudfront-us-east-1.images.arcpublishing.com/octane/4NBPDACMWJH63JQYJVK3QRBDZI.jpg)
/cloudfront-us-east-1.images.arcpublishing.com/octane/KKHQHRR3FJGX7H2IPU6RALMWG4.jpg)

/cloudfront-us-east-1.images.arcpublishing.com/octane/5IOFS5JAE5FOXMNA23ZRAVVYUU.jpg)
/cloudfront-us-east-1.images.arcpublishing.com/octane/CGXQ3O2VVJF7PGTYR3QICTLDLM.jpg)