


Sometimes the simplest approach is best. If your bike is (or merely feels) too tall, you can shorten the suspension or go straight to the source and slice precious inseam-snatching inches from the saddle. Custom seat work isn't that hard, though if you don't want to experiment with the stock item there are plenty of aftermarket alternatives, some with custom features for shorter riders. Try Sargent Cycle saddles (800/ 749-7328, www.sargentcycle.com) for custom work or Mustang (800/243-1392, www.mustangseats.com), Corbin (800/538-7035, www.corbin.com), or Saddlemen (800/397-7709, www.saddlemen.com) for some off-the-rack alternatives.

But you're the adventurous type, so chomping away at the stock seat sounds reasonable. You will need some basic tools: a good screwdriver, a heavy-duty staple gun, 100-grit sandpaper and hacksaw blades. A note on the blades: Any good blade will cut seat foam, but the best are medium-coarse pitch (18 teeth per inch) made from fully hardened material. These blades are more rigid than bimetal blades that have a hardened cutting edge mated to a flexible body, and make the work easier. Better yet, if you have one and can sneak it out of the kitchen, is an electric carving knife!

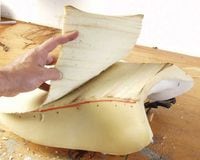
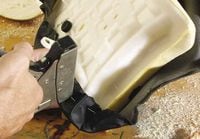
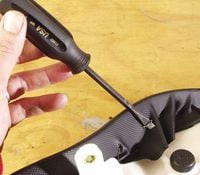
Remove the saddle and invert it on your workbench to remove the staples (1). Place the screwdriver under the staples and pull them out; you may discard the staples. Carefully peel the seat cover back from the base (2), watching for sections that may be glued down or otherwise held in place; some seats have supplemental restraints in difficult corners, for example.
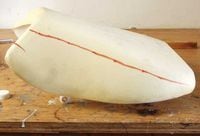
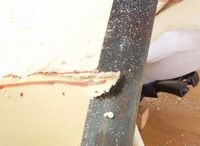
Determine how much you want to remove from the seat. As ever, take it a step at a time, considering how much material there is on the seat and how much you want to lower the overall seat height. You can always perform the operation again to take more off next time. Place a level or some other reference method across the top of the seat and measure the desired amount of the cut down the side of the foam (3). Mark several points along the side of the seat from front to back and then connect the dots (4) to form your cutting line. Repeat this operation on the other side of the seat.
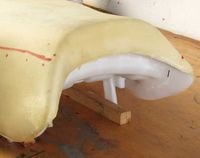
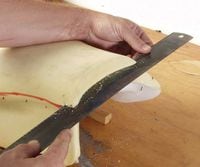
Secure the seat to the bench (5) so that you can see both sides. Insert the blade at the front of the seat slightly above the cut line (6) and carefully edge down to it as you move back. Slide the blade carefully left and right; don't ever force the work. Allow the blade to do the cutting. If you tear the foam, you'll have visible divots under the cover later. Continue working back, keeping the blade level and as flat as possible (7). Go slowly.
For additional legroom, consider increasing the cutback or chine of the forward part of the seat (8); such a move will normally not impair comfort but will allow you to more easily balance the bike at a stop. For a nicer finish, sand the foam with 100-grit sandpaper until the saw marks are no longer visible.
Tightly stretch the old seat cover over the foam and staple in place (9). Trim excess material and congratulate yourself on a job well done.
/cloudfront-us-east-1.images.arcpublishing.com/octane/S35YGSEMEZB4BLTDJTSZPF4GLA.jpg)
/cloudfront-us-east-1.images.arcpublishing.com/octane/5UOT6HPX2JFMRJAX6EH45AR4MQ.jpg)
/cloudfront-us-east-1.images.arcpublishing.com/octane/OKWOJWAKP5EP3OACCRRWPCIX2Q.jpg)
/cloudfront-us-east-1.images.arcpublishing.com/octane/2WF3SCE3NFBQXLDNJM7KMXA45E.jpg)
/cloudfront-us-east-1.images.arcpublishing.com/octane/G4MG6OUCJNBSHIS2MVVOTPX65E.jpg)
/cloudfront-us-east-1.images.arcpublishing.com/octane/IIGGWFOTOJGB7DB6DGBXCCMTDY.jpg)
/cloudfront-us-east-1.images.arcpublishing.com/octane/QSTCM6AVEZA5JJBUXNIQ3DSOF4.jpg)
/cloudfront-us-east-1.images.arcpublishing.com/octane/U4I7G625B5DMLF2DVIJDFZVV6M.jpg)
/cloudfront-us-east-1.images.arcpublishing.com/octane/B6XD6LS6IVCQPIU6HXDJSM3FHY.jpg)
/cloudfront-us-east-1.images.arcpublishing.com/octane/ICL63FEDDRDTTMINYICCEYGMDA.jpg)
/cloudfront-us-east-1.images.arcpublishing.com/octane/FCGZHQXRBZFLBAPC5SDIQLVF4I.jpg)
/cloudfront-us-east-1.images.arcpublishing.com/octane/WNOB6LDOIFFHJKPSVIWDYUGOPM.jpg)

/cloudfront-us-east-1.images.arcpublishing.com/octane/X33NU3E525ECRHXLNUJN2FTRKI.jpg)
/cloudfront-us-east-1.images.arcpublishing.com/octane/6KKT5NNL2JAVBOXMZYS5ZO76YA.jpg)
/cloudfront-us-east-1.images.arcpublishing.com/octane/J5RKG5O455GMPGQRF2OG6LRT7A.jpg)
/cloudfront-us-east-1.images.arcpublishing.com/octane/GX2CIZKQVRH2TATDM26KFG2DAE.jpg)
/cloudfront-us-east-1.images.arcpublishing.com/octane/ZWIDYSAKQZHD5BHREMQILXJCGM.jpg)
/cloudfront-us-east-1.images.arcpublishing.com/octane/CYUHJZCTSJCH3MRAQEIKXK7SCQ.jpg)
/cloudfront-us-east-1.images.arcpublishing.com/octane/LKOFINY56FCXJCANJ5M7ZDQUBY.jpg)
/cloudfront-us-east-1.images.arcpublishing.com/octane/4NBPDACMWJH63JQYJVK3QRBDZI.jpg)
/cloudfront-us-east-1.images.arcpublishing.com/octane/KKHQHRR3FJGX7H2IPU6RALMWG4.jpg)

/cloudfront-us-east-1.images.arcpublishing.com/octane/5IOFS5JAE5FOXMNA23ZRAVVYUU.jpg)