


Motorcyclists like to think of themselves as the cowboys of the open road, tough and self-reliant. But when something goes wrong—a flat tire or an electrical problem—some of them throw up their hands and call in the cavalry, which arrives in the form of a tow truck or a buddy with a trailer, and slink back to Dodge instead of riding off into the sunset. For some riders, though, a breakdown is just a minor inconvenience, one that can be dealt with using the tools and spares they take on every ride. Here are a few essentials to consider packing in case your chrome pony goes lame. If you bought your bike used and it didn't come with an owner's manual, get one. (Some manufacturers provide these free of charge as a PDF download; others want you to pay for a reprint. Check eBay.) In addition to the rookie stuff—how to shift gears, adjust the chain, and inflate the tires—most manuals include wiring diagrams that are handy for troubleshooting problems caused when the magic smoke leaks out. They also reveal the locations of potentially show-stopping fuses and relays; carry spares for the important ones, and be a little suspicious if the spares normally found in the fuse box are missing. That could be a sign of previous electrical trouble or maybe just a generous rider. Long trips warrant packing spare headlight and taillight bulbs, though you can forget the latter if your bike has an LED light.
Carrying a tool kit is a no-brainer. But some kits come with only a few cheap tools that are useful only if you run out of fishing weights. Replace the questionable ones with brand-name stuff. Add enough good-quality tools to at least adjust the chain, remove bodywork, adjust controls, and perform some basic electrical and plumbing repairs. Do you need to carry tools to remove the wheels? That depends. On bikes with tubeless tires, hauling the big wrenches is not usually worth the effort; if the on-bike tire repair doesn't work, you're calling for backup regardless. Different story with tube-type tires, since you'll need to remove the wheels to patch or replace tubes. Do a web search for tools with a tire iron on one end and a box wrench on the other.
Consider using only the tools in the kit for a while to do routine chores like chain adjustment and tire changes even if your fully stocked Snap-on rollaway is right next to the bike. Add whatever tools you lack for these jobs to your on-bike kit and you'll soon have everything you need to deal with just about any roadside dilemma. Whether you take it all with you depends on how much luggage space you want to sacrifice.
Flat tires suck. If you're riding on tubeless tires and you get nailed, you can get back on the road with a flat-repair kit (see the sidebar). Some riders advocate using canned fix-a-flat, but we don't because the success rate isn't perfect, and the inside of the tire will be an unholy mess that you or your mechanic will have to clean up. For post-repair inflation carry CO2 cartridges or, better yet, a small 12-volt air pump; CO2 runs out, but the pump keeps working as long as your battery lasts. Don't forget a pressure gauge and a couple of spare valve cores and caps.
Not every roadside emergency is a four-alarm catastrophe, but even small problems can slow you down. Take a mini-roll of duct tape to secure loose or rattling panels or to reinforce cracked windscreens, and bring electrical tape for insulating emergency wire splices. Wrap a bundle of zip-ties with several feet of safety wire and duct-tape it under the seat or on a frame tube. Stuff a shop rag somewhere in there, too—any oil or grease that gets on your hands goes right inside your gloves as soon as you're ready to ride—or pack a pair of latex or nitrile gloves or packaged clean-up towels for dirty work.
Our best advice? Practice using the tools actually in the kit. Better to know they don't quite do the job before you need them.
Plug Your Way to Freedom
WORDS & PHOTOS: Marc Cook

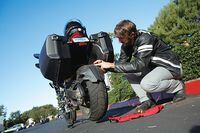
Nothing blunts your progress like a flat tire. And while punctures don't happen all that often, it still pays to be prepared. That's why we all carry mobile flat-repair kits when we test and travel. Bringing a small kit that weighs a couple of pounds is cheap insurance.
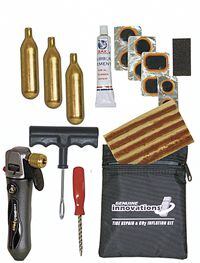
Now it's a matter of knowing how to use your tools. For this exercise, we're using a commercially available repair kit—there are several options from BikeMaster, Genuine Innovations, Progressive Suspension, and Stop & Go. Obviously, there are different kits for tube and tubeless tires, as well as some variations among the tubeless variety. We've used both the plug and the cord styles of tubeless kits with good success. The following walkthrough uses the plug style, but the essential process is the same with a rope.
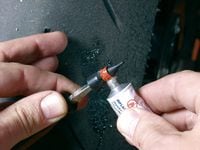
Start by finding the injury, removing the offending nail or screw, and cleaning the hole out as best you can. A little water or saliva on the suspected hole will help identify it. Use the supplied rasp or installation tool to clean out the hole (photo 1). Open the contact cement in the kit and apply some to the tool then coat the inside of the injury with glue. Apply cement liberally to the plug (photo 2) or coat the middle half of the rope (photo 3).

Using the installation tool, drive the plug into the tread until just 2–3mm of the head is showing. Carefully extract the tool from the plug. For the rope, insert until about a third remains visible; while the cement is still setting, pull firmly to remove the tool.
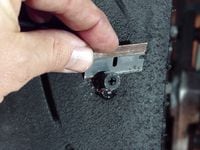
Allow the cement to set for 5–10 minutes, and then partially inflate the tire to check for leaks using water or saliva. If there are no bubbles, the fix is set and you can slice the exposed end of the plug or rope with a razor blade (photo 4), inflate the tire to the proper pressure, and be on your way.
If all else fails, a towing plan can make the difference between getting back on the road in a day or two and canceling your entire vacation. Some motorcycle organizations like the AMA offer plans, and insurance companies often add them to motorcycle policies for a small fee. The good ones even cover lodging while you wait for the bike to be fixed.
/cloudfront-us-east-1.images.arcpublishing.com/octane/VZZXJQ6U3FESFPZCBVXKFSUG4A.jpg)
/cloudfront-us-east-1.images.arcpublishing.com/octane/QCZEPHQAMRHZPLHTDJBIJVWL3M.jpg)
/cloudfront-us-east-1.images.arcpublishing.com/octane/HXOUJXQWA5HBHGRO3EMJIGFMVI.jpg)

/cloudfront-us-east-1.images.arcpublishing.com/octane/3TIWWRV4JBBOLDVGRYECVVTA7Y.jpg)
/cloudfront-us-east-1.images.arcpublishing.com/octane/KIX5O23D5NAIBGFXBN3327DKZU.jpg)
/cloudfront-us-east-1.images.arcpublishing.com/octane/7GJYDUIPXRGMTMQKN6ONYOLBOU.jpg)
/cloudfront-us-east-1.images.arcpublishing.com/octane/MUQLOVLL2ZDGFH25ILABNBXKTI.jpg)
/cloudfront-us-east-1.images.arcpublishing.com/octane/TNOU5DNE2BC57MFPMGN2EIDXAM.jpg)
/cloudfront-us-east-1.images.arcpublishing.com/octane/GTCXACQGJ5HAPDTGWUQKDEH44E.jpg)
/cloudfront-us-east-1.images.arcpublishing.com/octane/S35YGSEMEZB4BLTDJTSZPF4GLA.jpg)
/cloudfront-us-east-1.images.arcpublishing.com/octane/5UOT6HPX2JFMRJAX6EH45AR4MQ.jpg)
/cloudfront-us-east-1.images.arcpublishing.com/octane/OKWOJWAKP5EP3OACCRRWPCIX2Q.jpg)
/cloudfront-us-east-1.images.arcpublishing.com/octane/2WF3SCE3NFBQXLDNJM7KMXA45E.jpg)
/cloudfront-us-east-1.images.arcpublishing.com/octane/G4MG6OUCJNBSHIS2MVVOTPX65E.jpg)
/cloudfront-us-east-1.images.arcpublishing.com/octane/IIGGWFOTOJGB7DB6DGBXCCMTDY.jpg)
/cloudfront-us-east-1.images.arcpublishing.com/octane/QSTCM6AVEZA5JJBUXNIQ3DSOF4.jpg)
/cloudfront-us-east-1.images.arcpublishing.com/octane/U4I7G625B5DMLF2DVIJDFZVV6M.jpg)
/cloudfront-us-east-1.images.arcpublishing.com/octane/B6XD6LS6IVCQPIU6HXDJSM3FHY.jpg)
/cloudfront-us-east-1.images.arcpublishing.com/octane/ICL63FEDDRDTTMINYICCEYGMDA.jpg)
/cloudfront-us-east-1.images.arcpublishing.com/octane/FCGZHQXRBZFLBAPC5SDIQLVF4I.jpg)
/cloudfront-us-east-1.images.arcpublishing.com/octane/WNOB6LDOIFFHJKPSVIWDYUGOPM.jpg)
/cloudfront-us-east-1.images.arcpublishing.com/octane/X33NU3E525ECRHXLNUJN2FTRKI.jpg)