Bubbles Be Gone
About a foot before your turn-in point for the most challenging turn on your favorite road, you discover your brakes aren't quite what they used to be; mushy, ineffective-gee, that tree sure is big and stout. Assuming there's nothing amiss with pads, discs and calipers, it's likely that a good bleed job will set things right. Ask a motorcycle mechanic to list his least-favorite tasks, and bleeding brakes will surely show up in the top five. In truth, though, purging the brake hydraulic system of air bubbles-the lever comes back to the bar or the feedback is poor-is pretty simple and not dreadfully messy if you take your time.
Set the bike on its centerstand or track stand. Check the fluid level in the reservoir first (1). Clean carefully around the lid and take steps to protect any painted surfaces under the reservoir. Determine what kind of fluid is in the bike to start with. (Hint: Brown is bad.) DOT 3 and 4 fluid is not compatible with the silicone-based DOT 5 fluids. Most Japanese streetbikes will have DOT 4 fluid from the factory, but check your manual to be sure.
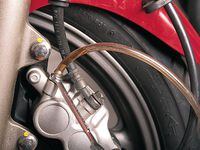
Make a quick visual inspection of the brake lines, looking for kinks, cracks and other evidence of deterioration. Pry off the rubber bleeder cover and clean the nipple and surrounding area with brake or electrical-contact cleaner (2). After slipping your box-end wrench over the bleeder bolt, attach a clear plastic hose (a pliable 31/416-inch diameter hose will work for most bikes) with the free end submerged in a plastic cup with a small amount of clean brake fluid (3). Try not to spill anything; brake fluid isn't kind to rubber and painted parts.
Cover the master-cylinder reservoir with a clean towel or replace the cap to keep from spilling fluid as you bleed the system. Begin by lightly pumping up the brakes at the lever or pedal. (We're showing you the front brake, but the rear system is functionally identical.) With light pressure held at the bar, gently crack the bleeder bolt until you see fluid emerge. Important: Close the bleeder before the lever reaches the bar to prevent sucking air back into the system. Gently release the brake lever and note the level of the fluid in the reservoir-never let it get too low or you'll have to start over.
Repeat the steps until the fluid coming from the caliper is free of bubbles. Move over to the other caliper and repeat the procedure. Sometimes air bubbles get trapped in crossover manifolds (4) or along high spots in the brake line. You may have to turn the bar to allow these bubbles to migrate upward to the master cylinder. (Here's where the tool junkies chime in to say that vacuum bleeders are superior, and on this count they're right.) Return the dust caps to the bleeder bolts, top off the reservoir and you're done.

/cloudfront-us-east-1.images.arcpublishing.com/octane/YBPFZBTAS5FJJBKOWC57QGEFDM.jpg)
/cloudfront-us-east-1.images.arcpublishing.com/octane/W5DVCJVUQVHZTN2DNYLI2UYW5U.jpg)
/cloudfront-us-east-1.images.arcpublishing.com/octane/C3VIRIAYNZCTJAZNRLREDS3JCM.jpg)
/cloudfront-us-east-1.images.arcpublishing.com/octane/XXWKUKITWRAF3HCJAWGJ25V7BA.jpg)
/cloudfront-us-east-1.images.arcpublishing.com/octane/MALB2TULBRCQJJ3P3UXMU2N7QE.jpg)
/cloudfront-us-east-1.images.arcpublishing.com/octane/B6KMLYR3T5GMNA7F7URZVLO72I.jpg)
/cloudfront-us-east-1.images.arcpublishing.com/octane/RIBH2PB5DBFEZFEYXDOD5Z6ECA.JPG)
/cloudfront-us-east-1.images.arcpublishing.com/octane/FY7HQZFIM5CYVAKOLBQ5F7BWZU.JPG)
/cloudfront-us-east-1.images.arcpublishing.com/octane/YGET42VCYRCEBOLKHTHFQGH72A.jpg)
/cloudfront-us-east-1.images.arcpublishing.com/octane/YLPY3KQYRVD2JG3RJMEQB4574A.jpg)
/cloudfront-us-east-1.images.arcpublishing.com/octane/RDF24VM7WVCOBPIR3V3R4KS63U.jpg)
/cloudfront-us-east-1.images.arcpublishing.com/octane/WQ2LIEL7RFBXFATR5LA6GOSRXE.jpg)
/cloudfront-us-east-1.images.arcpublishing.com/octane/W2F2QHY4VVFM7AJMV7N5SHSBPY.jpg)
/cloudfront-us-east-1.images.arcpublishing.com/octane/AFW7GSF47NEAPMYGVJ5RMMBDNE.jpg)
/cloudfront-us-east-1.images.arcpublishing.com/octane/GJHLAGRYXBH6BGCISATHTBLU24.jpg)
/cloudfront-us-east-1.images.arcpublishing.com/octane/HVZE5SURNNAYDLJVQ2BTWECIVI.jpg)
/cloudfront-us-east-1.images.arcpublishing.com/octane/NP5FHV6NRBGX5LQRUK3CA6A4BM.jpg)
/cloudfront-us-east-1.images.arcpublishing.com/octane/IE37M3MVXZAAVGHNGQVVL5YY5U.jpg)
/cloudfront-us-east-1.images.arcpublishing.com/octane/5L4R2YWNM5BNFCY3NVYUUCXM3M.jpg)
/cloudfront-us-east-1.images.arcpublishing.com/octane/UMAEHOQO55GWXFPIFP2MYGPGHA.jpg)
/cloudfront-us-east-1.images.arcpublishing.com/octane/S634O4RKRRHWHIRX5ZEDVV2HJY.jpg)
/cloudfront-us-east-1.images.arcpublishing.com/octane/TI3FVHFEHVDMFKIWWA3GZIFASE.jpg)
/cloudfront-us-east-1.images.arcpublishing.com/octane/W3MVEL2BIZBHPEXLPVE4MAYNWI.jpg)
/cloudfront-us-east-1.images.arcpublishing.com/octane/DF7G3Y7H6FBJRDLHR2ISRMHKEU.jpg)