Modern-day adjustable suspension is great. Simply turn a knob or a screw and you can make a real difference in your motorcycle’s ride or handling. Gone are the bad, old days of changing fluid viscosity, cutting fork-spring preload spacers out of PVC pipe or physically dismantling your fork or shock(s) to drill bigger holes in the damper rods.
Why then are so many riders reluctant to do their own motorcycle suspension tuning?
Aftermarket companies have made a fortune re-valving suspension for riders who probably didn't need to "get it done" in the first place. Why did they spend the money? Partly because they never took the time to learn what the various adjustments do, and heeded the advice of some owners' forum know-it-all. But mostly because they were afraid to experiment.
We’ve covered how to set sag before, so we won’t get into that here. Suffice it to say that you want to adjust spring preload so that the fork and shock settle approximately one-third of their total travel with you sitting in the saddle. Once set for your weight, spring preload should never have to be changed unless you decide to carry a passenger and/or luggage. That leaves the two damping adjustments: compression and rebound.
On most modern sportbikes, the rebound adjuster is on top of each fork leg and the compression adjuster is on the bottom. The shock is opposite: Rebound is on the bottom and compression is on top, or on the reservoir. Some cutting-edge sportbikes have separate motorcycle suspension tuning for high- and low-speed compression. Often the adjusters will be labeled, though rebound is sometimes abbreviated “TEN” for tension. Very simply stated, compression controls how quickly the suspension collapses when you hit a bump in the road, while rebound controls how quickly it extends to its original position.
Your bike’s standard suspension settings should be listed in your owner’s manual, so locate those before you get started. Some bikes (like KTMs) have a sticker with recommended settings under the seat. If you don’t have an owner’s manual, poke around online. If all else fails, you’ll have to check where your clickers are set yourself.
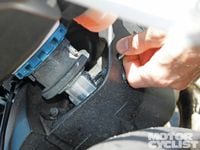
How do you do that? Simply by turning each knob or screw all the way in and counting the number of clicks (or turns, in the case of “clickless” adjusters). Stop when the adjuster is fully seated; trying to force it further could cause damage. Note the number of clicks, then turn the adjuster back out to where it was and move onto the next one. Obviously, the equivalent adjusters on both fork legs (or twin shocks) should be set the same.
In the pits at Daytona in 1993, I watched four-time World Champion Eddie Lawson familiarize himself with the Vance & Hines Yamaha Superbike he came out of retirement to race. Very systematically, he ran through the full range of suspension adjustments to determine the effect each had on the bike’s handling. Impressively, he was quickly up to speed and went on to win the 200.
We should each take a page from Lawson's book and experiment with our bike's full range of suspension adjustments. Don't be afraid to turn those dials! Worst case, you can revert to the stock settings. And don't go one click at a time—make big _changes, like two to four clicks, so you can _feel the difference.
Set a goal of finding two setups: the first for the freeway ride to the twisties, and the second for after you’ve arrived. Once you determine these settings, write them down in your owner’s manual or on a piece of tape under the seat. (If you want to go full-factory, get some of those stickers that aftermarket suspension companies use.) And make sure your toolkit contains whatever screwdriver or wrench you need to make those adjustments roadside.
In my experience, I've found that it seldom takes more than four clicks to transform a bike from freeway-cushy to backroad-stiff. So, while you're down on your hands and knees checking your tire pressures (you do check your tires, don't you?), why not take a few minutes to fine-tune your suspension?
Enjoy it while you can. Because with the advent of electronically adjustable suspension systems, we may someday look back fondly on the “bad, old days” when we had to adjust it ourselves! MC
/cloudfront-us-east-1.images.arcpublishing.com/octane/H7XEYPSN7XDYKL6IR4ZQPUNBSA.jpg)
/cloudfront-us-east-1.images.arcpublishing.com/octane/OKWOJWAKP5EP3OACCRRWPCIX2Q.jpg)
/cloudfront-us-east-1.images.arcpublishing.com/octane/2WF3SCE3NFBQXLDNJM7KMXA45E.jpg)
/cloudfront-us-east-1.images.arcpublishing.com/octane/G4MG6OUCJNBSHIS2MVVOTPX65E.jpg)
/cloudfront-us-east-1.images.arcpublishing.com/octane/IIGGWFOTOJGB7DB6DGBXCCMTDY.jpg)
/cloudfront-us-east-1.images.arcpublishing.com/octane/QSTCM6AVEZA5JJBUXNIQ3DSOF4.jpg)
/cloudfront-us-east-1.images.arcpublishing.com/octane/U4I7G625B5DMLF2DVIJDFZVV6M.jpg)
/cloudfront-us-east-1.images.arcpublishing.com/octane/B6XD6LS6IVCQPIU6HXDJSM3FHY.jpg)
/cloudfront-us-east-1.images.arcpublishing.com/octane/ICL63FEDDRDTTMINYICCEYGMDA.jpg)
/cloudfront-us-east-1.images.arcpublishing.com/octane/FCGZHQXRBZFLBAPC5SDIQLVF4I.jpg)
/cloudfront-us-east-1.images.arcpublishing.com/octane/WNOB6LDOIFFHJKPSVIWDYUGOPM.jpg)

/cloudfront-us-east-1.images.arcpublishing.com/octane/X33NU3E525ECRHXLNUJN2FTRKI.jpg)
/cloudfront-us-east-1.images.arcpublishing.com/octane/6KKT5NNL2JAVBOXMZYS5ZO76YA.jpg)
/cloudfront-us-east-1.images.arcpublishing.com/octane/J5RKG5O455GMPGQRF2OG6LRT7A.jpg)
/cloudfront-us-east-1.images.arcpublishing.com/octane/GX2CIZKQVRH2TATDM26KFG2DAE.jpg)
/cloudfront-us-east-1.images.arcpublishing.com/octane/ZWIDYSAKQZHD5BHREMQILXJCGM.jpg)
/cloudfront-us-east-1.images.arcpublishing.com/octane/CYUHJZCTSJCH3MRAQEIKXK7SCQ.jpg)
/cloudfront-us-east-1.images.arcpublishing.com/octane/LKOFINY56FCXJCANJ5M7ZDQUBY.jpg)
/cloudfront-us-east-1.images.arcpublishing.com/octane/4NBPDACMWJH63JQYJVK3QRBDZI.jpg)
/cloudfront-us-east-1.images.arcpublishing.com/octane/KKHQHRR3FJGX7H2IPU6RALMWG4.jpg)

/cloudfront-us-east-1.images.arcpublishing.com/octane/5IOFS5JAE5FOXMNA23ZRAVVYUU.jpg)
/cloudfront-us-east-1.images.arcpublishing.com/octane/CGXQ3O2VVJF7PGTYR3QICTLDLM.jpg)