There are a number of thread-renovating strategies out there, but the most readily available and easy-to-use kit is the Heli-Coil insert (stanleyengineeredfastening.com). Heli-Coil inserts are wound from diamond-section stainless steel and serve to replace worn-out threads, restoring the hole to the standard size and thread pitch.
Follow these Helicoil installation tips to avoid any problems:
1 If your threads need repair, don't despair. Heli-Coil kits are available at most hardware and auto parts stores and typically contain a drill bit, oversize tap, wire inserts, and the installation tool, which also doubles as a holder for the tap.
2 Start by drilling out the damaged threads with the bit included in the kit. If you misplace the drill bit or your kit didn't come with one, don't worry; the correct bit size will be inscribed on the tap. Drill deep enough to accommodate the original bolt.
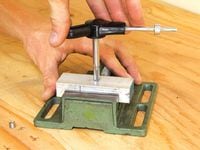
3 Install the tap in the handle and tap the hole, applying light pressure as you turn the tap clockwise. Ensure the tool is properly aligned in the hole, use plenty of lubrication (motor oil works fine), and back the tool out a half turn every two or three revolutions to clear away chips.
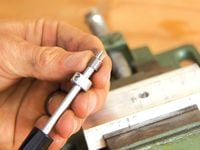
4 Remove the tap from the tool handle and slide the Heli-Coil insert onto the shaft with the tang resting in the slot. The tool winds the coil in via the tang, and once the insert is in place you snap the tang off. More on that in a moment.
5 Wind the insert into the hole. There's no need to apply pressure; let the Heli-Coil insert pull itself into the freshly tapped threads as you turn the tool clockwise. Wind the insert in a half to a full turn below the top of the hole.
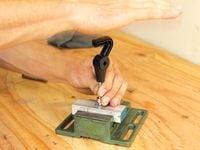
6 Remove the tool, turn it 90 degrees, reinsert it into the hole, rest it against the tang, and break the tang off the insert with a firm tap on the tool.
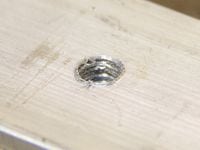
7 Job complete! The repaired threads are now ready for action.


/cloudfront-us-east-1.images.arcpublishing.com/octane/IIGGWFOTOJGB7DB6DGBXCCMTDY.jpg)
/cloudfront-us-east-1.images.arcpublishing.com/octane/QSTCM6AVEZA5JJBUXNIQ3DSOF4.jpg)
/cloudfront-us-east-1.images.arcpublishing.com/octane/U4I7G625B5DMLF2DVIJDFZVV6M.jpg)
/cloudfront-us-east-1.images.arcpublishing.com/octane/B6XD6LS6IVCQPIU6HXDJSM3FHY.jpg)
/cloudfront-us-east-1.images.arcpublishing.com/octane/ICL63FEDDRDTTMINYICCEYGMDA.jpg)
/cloudfront-us-east-1.images.arcpublishing.com/octane/FCGZHQXRBZFLBAPC5SDIQLVF4I.jpg)
/cloudfront-us-east-1.images.arcpublishing.com/octane/WNOB6LDOIFFHJKPSVIWDYUGOPM.jpg)

/cloudfront-us-east-1.images.arcpublishing.com/octane/X33NU3E525ECRHXLNUJN2FTRKI.jpg)
/cloudfront-us-east-1.images.arcpublishing.com/octane/6KKT5NNL2JAVBOXMZYS5ZO76YA.jpg)
/cloudfront-us-east-1.images.arcpublishing.com/octane/J5RKG5O455GMPGQRF2OG6LRT7A.jpg)
/cloudfront-us-east-1.images.arcpublishing.com/octane/GX2CIZKQVRH2TATDM26KFG2DAE.jpg)
/cloudfront-us-east-1.images.arcpublishing.com/octane/ZWIDYSAKQZHD5BHREMQILXJCGM.jpg)
/cloudfront-us-east-1.images.arcpublishing.com/octane/CYUHJZCTSJCH3MRAQEIKXK7SCQ.jpg)
/cloudfront-us-east-1.images.arcpublishing.com/octane/LKOFINY56FCXJCANJ5M7ZDQUBY.jpg)
/cloudfront-us-east-1.images.arcpublishing.com/octane/4NBPDACMWJH63JQYJVK3QRBDZI.jpg)
/cloudfront-us-east-1.images.arcpublishing.com/octane/KKHQHRR3FJGX7H2IPU6RALMWG4.jpg)

/cloudfront-us-east-1.images.arcpublishing.com/octane/5IOFS5JAE5FOXMNA23ZRAVVYUU.jpg)
/cloudfront-us-east-1.images.arcpublishing.com/octane/CGXQ3O2VVJF7PGTYR3QICTLDLM.jpg)

/cloudfront-us-east-1.images.arcpublishing.com/octane/OQVCJOABCFC5NBEF2KIGRCV3XA.jpg)
/cloudfront-us-east-1.images.arcpublishing.com/octane/OPVQ7R4EFNCLRDPSQT4FBZCS2A.jpg)
/cloudfront-us-east-1.images.arcpublishing.com/octane/YBPFZBTAS5FJJBKOWC57QGEFDM.jpg)